Category: Native

  • Customizing your WinDbg Workspace and Color Scheme

    My Eyes! The Goggles Do Nothing!

    WinDbg is a great tool for kernel and application debugging. Unfortunately, out of the box it also has a pretty useless workspace layout and (imho) a terrible color scheme. There are several themes that ship with it, if you look in the themes subdirectory of where the Debugging Tools are installed (e.g. C:\Program Files\Debugging Tools for Windows (x64)\themes). There is a also a themes.doc file that provides a bit of background on loading workspaces as well as providing screenshots of the provided workspaces.

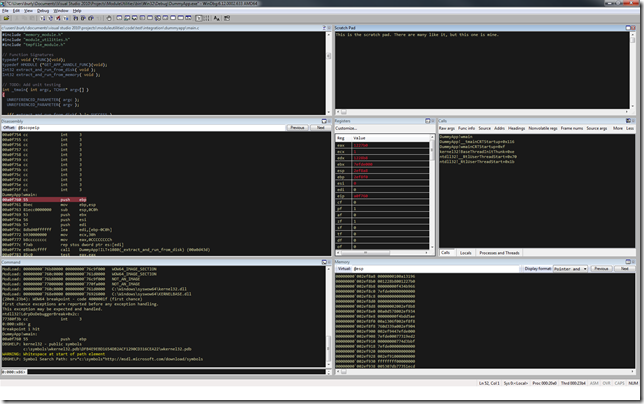
    Default WinDbg Workspace

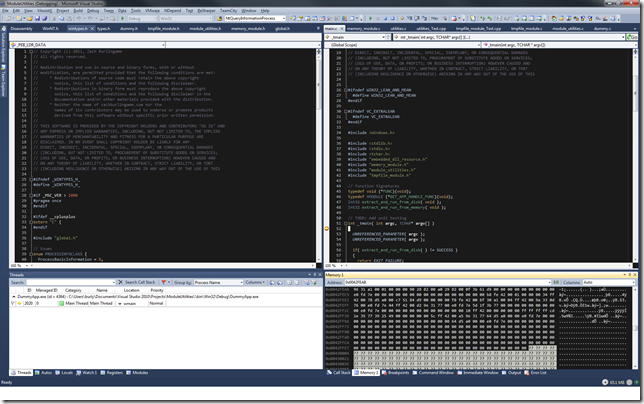
    I’m personally a big fan of dark color schemes as I find black-on-white strains my eyes after hours of staring at the monitor, even with the brightness and contrast levels adjusted. What I really want in WinDbg is a color scheme closer to what I use for Visual Studio with a layout most similar to another great debugger, OllyDbg. None of the provided workspaces come even close to what I want. I did some searching around but other than this article, I came up empty on any helpful content.

    VS2010 Color Scheme - Debugging

    Understanding WinDbg Workspaces

    The workspace includes the displayed windows, the window positions, font, color scheme, open files, register order, source file directory, symbol file directory, image file directory, and probably a few other tidbits that I’m forgetting.

    WinDbg breaks the workspaces out into four types – Dump, Explicit, Kernel, and User. Dump is used when you are debugging a dump file, explicit is when you create an custom workspace for a specific project (i.e. explicitly), kernel is for kernel debugging, and User is for …. regular user applications. WinDbg stores the settings for each of these types of workspaces in a matching registry key located under HKCU\Software\Microsoft\Windbg\Workspaces. In each of these keys is a binary value named “Default”. Additionally, there is an over-arching binary value named “Default” in the top-level Workspaces key. As far as I can tell, the top-level Default values are used for any workspace type but are superseded by any values in the nested keys. In practice however, I found it infuriating trying to determine exactly which inheritance style would be used between the two levels. As a result, I filled in values for everything in one of the workspaces and then just copied the “Default” value to each of the other four locations so that they were identical.

    Customizing Your Workspaces

    I first start by deleting any existing HKCU\Software\Microsoft\Windbg\Workspaces key (back it up first if you want to be able to restore what you had). Then I open WinDbg and add all the windows I wish to see. Once I get them laid out how I want, I edit the Font and Colors. Since I was basing the color scheme off an existing one, I found it easiest to take the 10 or so different colors and add them all to the custom colors palette for the process first. NOTE: The custom color palette does NOT persist beyond a restart of the application! Once you have the color palette, it’s just a matter of walking through each of the objects and selecting one of the existing colors. Once I’ve settled on the layout and color scheme, I select File->Save Workspace As… and use the name Default. Finally, I copy the Default binary value from the sub-key that was just created under HKCU\Software\Microsoft\WinDbg\Workspaces and copy it to the remaining four locations. Then it’s just a matter of exporting the Workspaces key to a file. It’s rather tedious but once you get this done once, you just import the registry key on any machine where you want to use WinDbg.

    Final Results

    This is ultimately what I came up with. It’s not perfect but it “feels” familiar enough to me that I’m happy with it. Getting here though, was a real chore. If you want my registry key for this settings, you can get it here. Note that this registry key contains some path information that is specific to my machine (e.g. source path) that’ll need to update once you install the key on your machine.
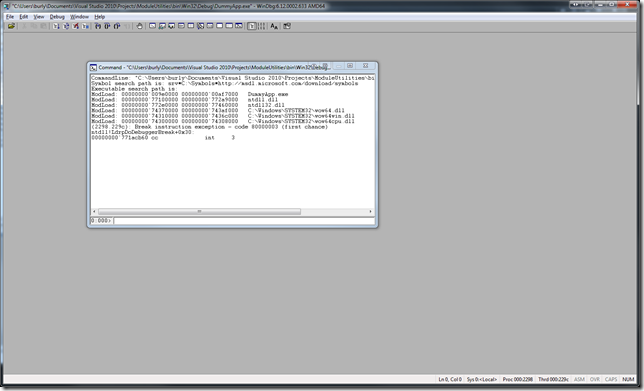
    WinDbg Dark Color Scheme

  • Setting a Debug Breakpoint in a Win32 API in Visual Studio

    Recently, I was stress-testing an application of mine and noticed that the handle count kept growing. After a quick check in Process Explorer I saw that the handle was for a registry key. I was curious as to where the key was being opened in the first place but, it wasn’t in my code so I couldn’t just set a breakpoint on a line in my source. Wouldn’t it be nice if you could set a breakpoint on a function in Visual Studio but that’s not in your code?

    You can! If you have the NT symbols loaded for your system, then you can set a breakpoint on any public function. In my particular case, I set a breakpoint on RegOpenKey and RegOpenKeyEx for both ANSI and UNICODE versions of the function.

    {,,Advapi32.dll}_RegOpenKeyA@12
    {,,Advapi32.dll}_RegOpenKeyW@12
    {,,Advapi32.dll}_RegOpenKeyExA@20
    {,,Advapi32.dll}_RegOpenKeyExW@20

    Note that you have to use the decorated name of the function. For Win32 API functions, you have to put an underscore before the function name and remember that many functions are macro redirected to ANSI or UNICODE versions with an A or W extension. Since most functions use the __stdcall calling convention the @<number> is generally 4x the number of arguments. So for RegOpenKey for example, it’s redirected to RegOpenKeyA or RegOpenKeyW and has 3 arguments, so it’s decorated name is _RegOpenKeyA@12 and _RegOpenKeyW@12.

    Similarly, you can set breakpoints in third-party libraries for public functions which assumes that you have a PDB for it.

    UPDATE 2011-11-13: You only have to use the decorated name of the function for 32-bit applications. For 64-bit applications, the names are undecorated, like this:

    {,,Advapi32.dll}RegOpenKeyA
    {,,Advapi32.dll}RegOpenKeyW
    {,,Advapi32.dll}RegOpenKeyExA
    {,,Advapi32.dll}RegOpenKeyExW

    Related: Can I Add a Breakpoint on CreateProcess in VS

  • C Assert and Wrapping Macros in Do/While Loops

    I was planning on writing a couple of entries on C macros, including assert macros and why you should wrap your macros in do/while loops. While doing a bit of research I came across a couple of excellent blog posts by Charles Nicholson on these very topics. Rather than try and out do him, I’ll just refer you to him!

    Building a Better Assert Macro
    http://cnicholson.net/2009/02/stupid-c-tricks-adventures-in-assert/

    Why You Should Be Wrapping Your Macros in Do/While Loops
    http://cnicholson.net/2009/03/stupid-c-tricks-dowhile0-and-c4127/

  • Limiting an Application to a Single Instance with Named Events

    Sometimes it’s desirable to allow only a single instance of an application per user or even per system. There are several ways you can do this.

    FindWindow

    In the case of a single instance per user session, you can use FindWindow to enumerate through the window handles for the current user session based on the window class and window title. This is actually how Microsoft Outlook does it. The drawback is that this only supports limiting the current session and it requires a window handle (i.e. doesn’t work in Console applications without creating a hidden window).

    Use a File or Registry as a Lock

    This method is used by VMware to establish whether a .vmdk file is locked by another process. Sometimes when you get an unclean shutdown of the owning VMware process, the file lock hangs around and the user must manually delete the file in order to boot the VM. This solution does not rely on a window handle and is thus applicable for any application that can access the disk which is good. However just like with with VMWare, using this as a solution for a single application instance could get us into a state where the user can’t run the app at all until they delete the lock file – not good.

    CreateMutex

    This is one of the most prevalent and well documented. This technique places a uniquely named mutex in the either the global namespace (for a single system-wide instance) or the local namespace (for a single session-wide instance) using the CreateMutex Win32 API call and then detecting whether the object already exists when the application first starts. The mutex is torn down when the last process that holds a handle to the object exits. This prevents use from getting in a stale state where we can’t start any instances of the application at all. Since this solution doesn’t require a handle to a window, it’s suitable for any type of Windows application (e.g. Windows Application/WinForm, Console, Service).

    CreateEvent

    This technique uses the same concept of a uniquely named event as the mutex technique. Also like the mutex solution, it’s suitable for any type of Windows application and the event is torn down when the last process that holds a handle to the event exits. The reason I choose this method over the global mutex however is that I overload the use of this event to serve as my shutdown signal. This allows me to use the same object to determine if an instance of an application is running as well as signal all instances of the application to terminate if necessary.

    Based on my signal terminate solution here, you can limit an application to a single instance by removing this from initialize_terminate_event in signal_terminate.c

      // Make sure our instance of the application didn't already initialize the event
      if( fh_terminate_event != NULL )
      {
        return SUCCESS;
      }
    

    and calling it at the beginning of your application’s main routine like this.

    // Library Includes
    #include <Windows.h>
    #include <stdio.h>
    
    // Application Includes
    #include "error_codes.h"
    #include "terminate.h"
    #include "types.h"
    
    Int32 main( Int32 argc, Char* argv[] )
    {
      Int32 return_code = initialize_terminate_event( );
      // If the event already exists or if there is an error 
      // creating the event, just exit. 
      if( return_code != SUCCESS )
      {
         return return_code;
      }
    
      // Main routine here
    }
    
  • Simple Reader-Writer Lock in C on Win32

    In a particular native C Win32 application, I have a few threads that regularly read a particular set of information while performing their main work routines and a single thread that updates that information. A readers-writer lock is well suited to a workload that is heavily read based with scarce writes.

    The Win32 API provides a Slim Reader-Writer Lock. The problem is that it wasn’t added until Vista and I still need to support Windows XP. I wasn’t too keen on writing my own as writing thread-safe code – particularly synchronization objects – is notoriously tricky. A quick search turned up several solutions for a reader-writer lock in C++, but not too many in C. I was even less keen on using a fully-featured RWLock that wasn’t from a mature and active project or porting an implementation from C++. Fortunately, a basic RWL is not that difficult as far as synchronization objects go.

    I decided to roll my own and I’ve placed the project on Bitbucket here. As I come across other threading needs, I’ll add any functions and utilities to it. There are certainly no guarantees that my implementation is bug-free but I did at least give a bit of thought. If you find anything, please share so that I can fix it!

  • Creating Temporary Files on Win32 in C – Part 2

    Last post I talked about the existing options for creating a temporary file on Win32 and the pros and cons of each. This time I’m going to show you the solution that I normally use.

    I stated that a temporary file solution would ideally be:

    • Cross-platform
    • Guarantee a unique name
    • Support SBCS/MBCS/Unicode
    • Allow you to have some control over where the file goes
    • Automatically delete itself when you close it or the process exits.

    I pretty much gave up on the cross-platform goal after reading through the various existing options. The level of complexity that was going to be required to handle all the nuances just wasn’t worth it to me.

    A Partial Solution

    I settled on a partial solution. One function which returns a temporary filename, supports SBCS/MBCS/Unicode, checks whether the filename already exists, and allows you to specify either the basepath or the filename (or both). Automatically deleting the file when you close it or the process exits is achieved via CreateFile and FILE_FLAG_DELETE_ON_CLOSE.

    Ignoring the cross-platform goal, there are still two problems with this implementation.

    1. By separating the filename creation from the file creation, we still suffer from Race condition 2 “The function only generates filenames which are unique when they are created. By the time the file is opened, it is possible that another process has already created a file with the same name.”
    2. CreateFile returns a HANDLE, not a FILE* so you have to the API calls WriteFile, CloseFile, etc. rather than the CRT calls to fwrite, fclose, etc. [1]
    [1] It may be possible to convert a Win32 HANDLE to a FILE* based on the information in this article.

    Getting the Temporary Filename

    #include <Windows.h>
    #include <errno.h>
    #include <stdlib.h>
    #include <tchar.h>
    
    #define SUCCESS                               +0
    #define FAILURE_NULL_ARGUMENT                 -1         
    #define FAILURE_INSUFFICIENT_BUFFER           -2
    #define FAILURE_API_CALL                      -3
    #define FAILURE_INVALID_PATH                  -4
    #define FAILURE_FILE_ALREADY_EXISTS           -5
    
    Bool directory_exists( LPCTSTR p_path )
    {
      DWORD attributes = GetFileAttributes( p_path );
      return ( attributes != INVALID_FILE_ATTRIBUTES &&
             (attributes & FILE_ATTRIBUTE_DIRECTORY) );
    }
    
    Bool file_exists( LPCTSTR p_path )
    {
      DWORD attributes = GetFileAttributes( p_path );
      return ( attributes != INVALID_FILE_ATTRIBUTES &&
             !(attributes & FILE_ATTRIBUTE_DIRECTORY) );
    }
    
    int get_tmp_filename( LPCTSTR p_filename,
                            LPCTSTR p_basepath,
                            LPTSTR  p_tmp_filename,
                            DWORD   tmp_filename_size )
    {
      TCHAR   tmp_path[MAX_PATH]  = { 0 };
      TCHAR   tmp_name[MAX_PATH]  = { 0 };
    
      // Parameter Validation
      if( p_tmp_filename == NULL )
      {
        return FAILURE_NULL_ARGUMENT;
      }
    
      // Get a basepath
      if( p_basepath != NULL )
      {
        _tcscpy_s( tmp_path, MAX_PATH, p_basepath );
      }
      else
      { // Use the CWD if a basepath wasn't supplied
        _tcscpy_s( tmp_path, MAX_PATH, TEXT(".\\") );
      }
      if( !directory_exists( tmp_path ) )
      {
        return FAILURE_INVALID_PATH;
      }
    
      // Form the full filename
      if( p_filename != NULL )
      {
        _tcscpy_s( tmp_name, MAX_PATH, tmp_path );
        _tcscat_s( tmp_name, MAX_PATH, TEXT("\\") ); 
        _tcscat_s( tmp_name, MAX_PATH, p_filename );
      }
      else
      { // Get a temporary filename if one wasn't supplied
        if( GetTempFileName( tmp_path, NULL, 0, tmp_name ) == 0 )
        {
          _ftprintf( stderr, TEXT("Error getting temporary filename in %s.\n"), tmp_path );
          return FAILURE_API_CALL;
        }
      }
    
      // Copy over the result
      switch( _tcscpy_s( p_tmp_filename, tmp_filename_size, tmp_name ) )
      {
      case 0:
        // Make sure that the file doesn't already exist before we suggest it as a tempfile.
        // They will still get the name in-case they intend to use it, but they have been warned.
        if( file_exists( tmp_name ) )
        {
          return FAILURE_FILE_ALREADY_EXISTS;
        }
        return SUCCESS;
        break;
      case ERANGE:
        return FAILURE_INSUFFICIENT_BUFFER;
        break;
      default:
        return FAILURE_API_CALL;
        break;
      }
    }
    

    Create a File that is Automatically Deleted when the Last Handle is Closed or the Program Terminates Normally

    HANDLE h_file = CreateFile( tmpfilename, 
                              GENERIC_READ, 
                              FILE_SHARE_READ, 
                              NULL,
                              OPEN_EXISTING, 
                              FILE_FLAG_DELETE_ON_CLOSE,
                              NULL );
    

    An Example of Putting It All Together

      HANDLE h_file;
      int    return_code;
      TCHAR  tmpfilename[_MAX_PATH] = { 0 };
    
      int return_code = get_tmp_filename( NULL, NULL, tmpfilename, _MAX_PATH );
      switch( return_code )
      {
      case FAILURE_FILE_ALREADY_EXISTS:
        break;
      case SUCCESS:
        break;
      default:
        return return_code;
      }
    
      // Extract the DLL to disk
      h_file = CreateFile( tmpfilename, 
                             GENERIC_READ, 
                             FILE_SHARE_READ, 
                             NULL,
                             OPEN_EXISTING, 
                             FILE_FLAG_DELETE_ON_CLOSE,
                             NULL );
      if( h_file == INVALID_HANDLE_VALUE )
      {
        _ftprintf( stderr, TEXT("Error creating temporary file %s.\n"), tmpfilename );
        return GetLastError();
      }
    
  • Creating Temporary Files on Win32 in C – Part 1

    So you wanna create a temporary file?

    You’re in C, on Windows, and you want to create a temporary file. Ideally it would be:

    • Cross-platform
    • Guarantee a unique name
    • Support SBCS/MBCS/Unicode
    • Allow you to have some control over where the file goes
    • Automatically delete itself when you close it or the process exits.

    You wish. There are at least four primary ways of creating a temporary file (if you include the Secure CRT, Unicode, MBCS, and TCHAR versions then there are at least 12)! Each of these provides one or two of the ideal features above, with a few providing more when used in combination with other functions. None of them provides all of these features.

    In this post we discuss what our basic options are when creating a temporary file on Windows in C. In Part 2 we’ll discuss which method I prefer and how I’ve implemented it.

    So tell me, What are my Options?

    tmpnam

    Creates a unique filename for the current-working directory of the process

    • Pros:
      • Part of the ISO C Standard
    • Cons
      • No unicode support
      • Potentially unsafe if the parameter is non-NULL and insufficiently sized
      • Race condition 1 – If the str parameter NULL, the returned str points to an internal static buffer that will be overwritten by subsequent calls from the same process.
      • Race condition 2 – The function only generates filenames which are unique when they are created. By the time the file is opened, it is possible that another process has already created a file with the same name.

    _wtmpnam

    Unicode version of tmpnam

    Pros/Cons are the same as tmpnam, except it supports UNICODE instead of SBCS/MBCS and is Windows-only.

    _ttmpnam

    Generic-Text Routine Mapping. Used with TCHAR to map to tmpnam in MBCS builds and _wtmpnam in UNICODE builds.

    Pros/Cons are the same as tmpnam/_wtmpnam except it can support either MBCS/UNICODE at build time and is Windows-only

    tmpnam_s

    Security-Enhanced CRT version of tmpnam

    • Pros:
      • Security enhancements (avoids buffer overflow and ensures null termination of string)
    • Cons:
      • Unique filenames in CWD only
      • No unicode support
      • Race condition 1 (see tmpnam above)
      • Race condition 2 (see tmpnam above)
      • Windows-only

    _wtmpnam_s

    Unicode version of tmpnam_s

    Pros/Cons are the same as tmpnam_s, except it supports UNICODE instead of SBCS/MBCS.

    _ttmpnam_s

    Generic-Text Routine Mapping. Used with TCHAR to map to tempnam in MBCS builds and _wtempnam in UNICODE builds.

    Pros/Cons are the same as _ttmpnam_s/_wtmpnam_s except it can support either MBCS/UNICODE at build time

    _tempnam

    From MSDN:

    “_tempnam will generate a unique file name for a directory chosen by the following rules:

    – If the TMP environment variable is defined and set to a valid directory name, unique file names will be generated for the directory specified by TMP.
    – If the TMP environment variable is not defined or if it is set to the name of a directory that does not exist, _tempnam will use the dir parameter as the path for which it will generate unique names.
    – If the TMP environment variable is not defined or if it is set to the name of a directory that does not exist, and if dir is either NULL or set to the name of a directory that does not exist, _tempnam will use the current working directory to generate unique names. Currently, if both TMP and dir specify names of directories that do not exist, the _tempnam function call will fail.

    The name returned by _tempnam will be a concatenation of prefix and a sequential number, which will combine to create a unique file name for the specified directory. _tempnam generates file names that have no extension. _tempnam uses malloc to allocate space for the filename; the program is responsible for freeing this space when it is no longer needed.”

    • Pros:
      • There is a way to use a directory other than the default
      • Allocates memory for the return call so you don’t have to guess the size ahead of time
    • Cons:
      • Using a directory other than the default requires changing environment variables for the entire process
      • Holy crap, did you see how complex the rules are just to get a stupid temporary file name?!
      • Only creates a filename, not a file so Race Condition 2 applies again.
      • No Unicode support
      • Allocates memory that the caller has to remember to free (I like to keep my mallocs and frees matched as close together as possible)
      • Windows-only

    _wtempnam

    Unicode version of _tempnam

    Pros/Cons are the same as _tempnam, except it supports UNICODE instead of SBCS/MBCS

    _ttempnam

    Generic-Text Routine Mapping. Used with TCHAR to map to tempnam in MBCS builds and _wtempnam in UNICODE builds.

    Pros/Cons are the same as tempnam/_wtempnam except it can support either MBCS/UNICODE at build time

    tmpfile

    Creates a temporary file

    • Pros:
      • Part of the ISO standard
      • Creates a file (not a filename) and thus avoids Race Condition 2
      • The temporary file is automatically deleted when the file is closed, the program terminates normally, or when _rmtmp is called (assuming that the CWD doesn’t change)
    • Cons:
      • Creates a temporary file in the root directory – WTH?! This of course, requires Admin privs on Vista and later.

    tmpfile_s

    Windows-only version of tmpfile with the Secure-CRT enhancements.

    Pros/Cons are otherwise the same as tmpfile.

    GetTempFileName

    Creates a name for a temporary file. If a unique file name is generated, an empty file is created and the handle to it is released; otherwise, only a file name is generated.

    MSDN has an article on “Creating and Using a Temporary File” that uses this function. Note that it uses CreateFile which returns a HANDLE not a FILE*.

    • Pros:
      • Supports both Unicode (via GetTempFileNameW macro resolution) and MBCS (via GetTempFileNameA macro resolution)
      • Allows the caller to specify the path (yay!)
      • Allows the caller to specify a filename prefix (up to three characters)
    • Cons:
      • Caller needs to make sure the out buffer is MAX_PATH chars to avoid buffer overflow
      • While it can create the file, it releases the handle, which the caller has to reopen. This can create a security vulnerability where someone else can get to the file before the intented caller does.
      • Windows-only


  • Signal a Windows Application to Terminate from Another Process

    In usual fashion, I’ve written a complete sample application. The source code is available here.

    Sometimes you want detect if a specific application is running and signal it to terminate in a clean manner. It may be your upgrade installer making sure that the current version of the application is not running before performing it’s upgrade. It could be a long running helper process that needs to be signaled when it is no longer needed. Whatever it is, one method to accomplish this is to use a uniquely named shared event.

    NOTE: The method I’m about describe only works for processes who’s source code is under your control. If you want a way to generically signal any running process (e.g. search for a list of running OS and 3rd-party processes that might interfere with your installer and signal them to terminate) then this is not what you want.

    A Bit of Background

    A similar problem to the one we are discussing here is signaling all running threads to terminate. The idea is that there could be multiple places in the code where an application might need to initiate a process termination, but you need to synchronize that across all threads and allow them to perform their own cleanup. One way to do this is have long running threads periodically check to see if they should shutdown by checking to see if an event is signaled.

    Windows Events

    On the Windows platform when an event object is created it is done so in an object namespace. In addition to the ability to create your own private namespaces, there are also two special kernel object namespaces – Global and Local. There is a Local namespace associated with each client session on the machine. By default the Local namespace is used for any object created by a process that was started under a client session. As the name implies, there is a single Global namespace system-wide. The Global namespace is used primarily by system services but can also be used by client session processes by prefixing the event name with “Global\”.

    The CreateEvent function is used to (surprise!) create an event. It can create either a named or unnamed event. If you use a named event and the named event already exists before the call to CreateEvent then the function returns a handle to the existing object and GetLastError returns ERROR_ALREADY_EXISTS. By creating a named event, the OS enforces that only a single instance of the object exists in that namespace at any one time and that all processes referring to that event will receive a handle to the same instance, creating a form of interprocess communication. Thus if the Local namespace is used, then the event object is shared across all processes that refer to it in that client session. Likewise if it is created in the Global namespace, it is shared across all processes that refer to it on the entire system.

    There are two reset mechanisms used by event objects: AutoReset and ManualReset. An AutoReset event will automatically be reset to a non-signaled state as soon as single waiting thread is released. A ManualReset event requires a call to ResetEvent in order to be returned to a non-signaled state.

    Lastly, an event can be set to either the signaled or non-signaled state when it is initially created.

    Signal Terminate via Named Event Object

    By combining the concept of checking for a signaled event to determine when to shutdown and using a named event object, it is possible to signal one process to shutdown via another process. By using an event object created in the Local namespace you can signal processes across a single client session. Conversely by using an event object created in the Global namespace you can signal processes across the entire system.

    When creating the terminate event object you want to use a ManualReset event created in the non-signaled state initially. If it were instead an AutoReset event, then as soon as one of the waiting threads from any of the processes was released, the event would return to the non-signaled state. This would result in only a single thread receiving the terminate message, which is not what we want. As for the state, if it were instead initially signaled then the threads would begin terminating as soon as they started running and began checking the event.

    Below is an example of creating a named ManualReset event in the Local object namespace that is intially non-signaled. I’m using a GUID for the object name to avoid the potential for unintentional naming collisions with other applications. While a GUID is probably overkill, using a name like “shutdown_event” probably isn’t a good idea.

    static const LPCSTR fp_terminate_event_name =
       "Local\\0BAF85D0-0786-4cbf-AF3B-E36322382DBF";
    
    // Create a manual-reset event in the non-signaled state
    fh_terminate_event =
      CreateEvent( NULL,                              // default security attributes
                   TRUE,                              // manual-reset event.
                   FALSE,                             // initial state is non-signaled
                   TEXT( fp_terminate_event_name ) ); // object name
    
  • Silently Terminate on Abort/Unhandled Exception in Windows

    When an application has an unhandled exception or a system routine calls abort (e.g. strcpy_s with a buffer size too small) the system is left to deal with the mess. Usually part of the process is displaying a crash dialog to the user notifying them that the application has unexpectedly terminated, creating a crash dump file, and possibly checking with Microsoft for a solution if it’s a known problem. Sometimes however, you’d prefer that your application not crash in such an “in your face” manner, such as when you spawn child or helper processes as part of a larger system which can manage the process termination on its own. The first thing you should do is focus on making your application NOT crash in the first place!

    However, there are times when things may be beyond your control (e.g. making calls to a third-party library that sometimes wigs out on you) or you just want it as a fail safe in case. You can use you own unhandled-exception handler for instance, to perform custom logging. There are several manners in which the system and the C-runtime can notify the user of an abnormal application termination. In order to suppress all of them, most of the time, I use the following routines:

    You’ll note that I said most of the time because this method doesn’t guarantee that all of them will be suppressed. Other libraries you call could overwrite your handlers for one. Secondly, the /GS (Buffer Security Check) compiler flags causes the CRT to directly invoke Dr. Watson in the case of a buffer-overrun for security purposes. To prevent and detect other libraries from overwriting your exception filter, you can use API hooking.  When it comes to the CRT directly calling Dr. Watson, this is by design and Microsoft has no plans of changing it.

    Here’s the important parts of the source. The entire project is available here.

    #include <stdio.h>
    #include <stdlib.h>
    #include <Windows.h>
    
    // Function Declarations
    void suppress_crash_handlers( void );
    long WINAPI unhandled_exception_handler( EXCEPTION_POINTERS* p_exceptions );
    
    int main( int argc, char* argv[] )
    {
      // Suppress C4100 Warnings for unused parameters
      (void*)argc;
      (void*)argv;
    
      suppress_crash_handlers( );
    
      abort( );
    
      return -1;
    }
    
    void suppress_crash_handlers( )
    {
      // Register our own unhandled exception handler
      // http://msdn.microsoft.com/en-us/library/ms680634(v=vs.85).aspx
      SetUnhandledExceptionFilter( unhandled_exception_handler );
    
      // Minimize what notifications are made when an error occurs
      // http://msdn.microsoft.com/en-us/library/ms680621(v=vs.85).aspx
      SetErrorMode( SEM_FAILCRITICALERRORS | SEM_NOALIGNMENTFAULTEXCEPT | SEM_NOGPFAULTERRORBOX | SEM_NOOPENFILEERRORBOX ); 
    
      // When the app crashes, don't print the abort message and don't call Dr. Watson to make a crash dump.
      // http://msdn.microsoft.com/en-us/library/e631wekh(v=VS.100).aspx
      _set_abort_behavior( 0, _WRITE_ABORT_MSG | _CALL_REPORTFAULT );
    }
    
    long WINAPI unhandled_exception_handler( EXCEPTION_POINTERS* p_exceptions )
    {
      // Suppress C4100 Warnings unused parameters required to match the 
      // function signature of the API call.
      (void*)p_exceptions;
    
      // Throw any and all exceptions to the ground.
      return EXCEPTION_EXECUTE_HANDLER;
    }
    
  • Capturing Windows Power Events in a Console Application

    So you’re writing a console application and you think “Hey, it would be great if I could catch power events so I could:”

    • get all my data in a sane state before a shutdown
    • defer heavy processing until we are back on AC power
    • reinitialize network resources if we just returned from an unexpected sleep state

    You fire off a Google search for “Windows Power Events” and you quickly come across this MSDN article that tells you that you need to call the RegisterPowerSettingNotification API function. Super! Then you quickly notice a few problems:

    1. The RegisterPowerSettingNotification function takes either a Window Handle or a SERVICE_STATUS_HANDLE.
      1. You’re a console application so you don’t have a Window handle.
      2. You aren’t running as a service so you can’t call RegisterServiceCtrlHandlerEx to get a SERVICE_STATUS_HANDLE
    2. The minimum supported client is Windows Vista and you would like to at least support Windows XP forward.

    Ahh, crap. As far as my (prolonged) search results show, there is no way to receive power events without either having a window handle, running as a service or being a device driver. Period.

    Enter the Hidden Window

    The best solution to this problem that I’ve come across is to create a hidden window. It seems like such a hack, but it does work! There are a few things you need to be aware of when using this method. As per MSDN recommendations one should generally use a single thread to create all of their windows. The system directs messages to individual windows, so you need to process the message queue on the same thread that created the window*. In a Windows application this is generally all done in WinMain. However for a console application, we likely have other things going on in the main thread, especially if we want the power event notifications to be available early on in the application startup process. Therefore I create a separate thread which will create the hidden window, register for power events, and then continuously process the message loop.

    * In fact, the message queue is really the thing that we need in all this so that we can receive the WM_POWERBROADCAST messages. AFAIK, the only ways to get a message queue are via creating a window or running as a service.

    Power Events

    After you have a thread and create a window you will automatically receive the WM_POWERBROADCAST messages in your message queue for the following power events:

    Windows 2000 and Later
    PBT_APMPOWERSTATUSCHANGE
    PBT_APMRESUMEAUTOMATIC
    PBT_APMRESUMESUSPEND
    PBT_APMSUSPEND
    PBT_POWERSETTINGCHANGE

    Windows 2000, Windows XP, and Windows Server 2003 only
    PBT_APMBATTERYLOW
    PBT_APMOEMEVENT
    PBT_APMQUERYSUSPEND
    PBT_APMQUERYSUSPENDFAILED
    PBT_APMRESUMECRITICAL

    As you can see you may not even need to call RegisterPowerSettingNotification at all to get the events you need! In the case of Windows XP, these are all that you are going to get. On Vista and later however, you may still want to register for additional power events. There are several more event types that you can register for, which are described here. The ones that I cared about were:

    GUID_ACDC_POWER_SOURCE
    GUID_BATTERY_PERCENTAGE_REMAINING
    GUID_MONITOR_POWER_ON

    Show Me Teh Codez!

    I wrote a sample console application in C that creates a hidden window on a separate thread, tries to register for additional power events if they are available, and then processes the message queue until the user enters input twice. It prints the message type of any window message it receives, but it provides additional information for power events. The application has both 32- and 64-bit builds and has been tested on Windows XP Home RTM 32-bit and Windows 7 Home Premium 64-bit.  It is written with Visual Studio 2010 but the code should work on previous versions of VS as well, you’ll just have to migrate the project and solution settings.

    NOTE: In order to build for Windows XP RTM/SP1 I targeted the v90 (Visual Studio 2008) toolset. You must have Visual Studio 2008 installed to do this. See my post here on how and why I have to do this.

    https://bitbucket.org/zachburlingame/windowspowerevents

    Additional Resources