Category: SysAdmin

  • Resolving Event ID 1053 on Windows Server 2012 R2 with DHCP and Multiple NICs

    The Problem

    The DHCP server on my Windows Server 2012 R2 Essentials domain controller shutdown (Event ID 1054) when I added an additional NIC and plugged it in. The root cause as reported in the event log was an EventID 1053 stating: “The DHCP/BINL service has encountered another server on this network with IP Address, x.x.x.x, belonging to the domain: .”

    Background

    One of the built-in features to Window’s DHCP server is rogue DHCP server detection. If more than one server on a LAN segment is responding to DHCP requests then all hell breaks loose. By default, when the Windows DHCP server detects a rogue DHCP server, it shuts itself down reporting Event IDs 1053 and 1054.

    In my case, I do want the DC’s DHCP server to service requests on one of the LAN segments which is on one of the NICs. However, I have a second NIC that I’m passing through to virtual machines that I do not want the DC to even have an IP address, much less to service DHCP requests. There is a virtual machine running on that LAN segment which is servicing the DHCP requests. The Windows DHCP server however listens for DHCP servicing on all network interfaces. So although the DC’s DHCP has no responsibility to service that scope, for whatever reason, it is still insisting on shutting down in the presence of this other DHCP server. I tried authorizing the other DHCP server, I tried removing the binding to that network, I tried giving it a static IP address on that network and all sorts of other variations. I would expect that there is a proper way to fix this but I was completely unable to determine what that fix is. It may be that the authorization didn’t work because the other DHCP server isn’t a Windows machine or that the Essentials SKU doesn’t support multiple DHCP servers.

    Solution

    The only solution that I could find that worked was a registry modification to disable rogue DHCP server detection. This is sort of the nuclear option and I would have liked a more elegant solution, but this is what I’ve got.

    NOTE: Be sure that this is what you want to do! In most cases, you do not want to do this. You frequently want to adjust your scopes, adjust your bindings, or use DHCP relays/IP helpers and rarely do you ever want to resort to turning off rogue DHCP detection.

    1. Add a new registry value entry to HKEY_LOCAL_MACHINE\SYSTEM\CurrentControlSet\Services\DHCPServer\Parameters of type REG_DWORD named DisableRogueDetection with a value of 0x1
    2. Restart the Windows DHCP server which as been shutting down with EventIDs 1053,1054

    Reference

    DHCP network interface card bindings
    DHCP Binding only to one interface card
    Event ID 1053 — DHCP Authorization and Conflicts
    DHCP/BINL Service
  • Using Mercurial over HTTPS with TeamCity

    Uh oh, it’s b0rked

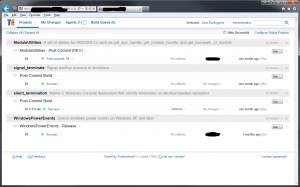
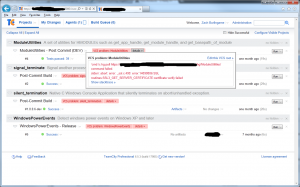
    I use Mercurial as my VCS for all my personal projects and JetBrains TeamCity for my build server. Naturally, I need TeamCity to talk to the VCS. There are two basic ways you can serve Mercurial repos: over HTTP(S) using something like hgweb.cgi and over SSH. I use SSH with public key authentication for all of my development boxes and it works great. However, SSH public key auth requires that I have a full-blown shell account on the VCS server. I really didn’t want to have a shell account dedicated for the TeamCity user, so I preferred using HTTPS. Starting with 1.6.4, Mercurial began (smartly) verifying SSL certificates. This coupled with my use of self-signed certificates caused me to get errors in TeamCity from Mercurial when it was trying to pull from the VCS server:

    ‘cmd /c hg pull https://mercurial.mydomain.com/hg/ModuleUtilities’
    command failed.
    stderr: abort: error: _ssl.c:490: error: 14090086:SSL
    routines:SSL2_GET_SERVER_CERTIFICATE:certificate verify failed

    Teamcity Mercurial Error
    Teamcity Mercurial Error

    Ahh, I think I know what’s going on here…

    The fix for this actually fairly simple: add the self-signed cert to the trusted chain. The tricky bit however, is that Mercurial doesn’t use the Windows certificate store so adding an entry like you would for say, Internet Explorer, won’t work. Instead, Mercurial uses a cacert.pem file. For these instructions, I’m using TortoiseHg as my Mercurial client on the build server. The basic concept however, applies regardless of the specific client so it should be fairly easy to adapt to your environment.

    A Walk-through the park

    The first step is to get the necessary certificate information. I did this by browsing to the URL of one of the repositories in Internet Explorer. For example:

    https://mercurial.mydomain.com/hg/myrepo

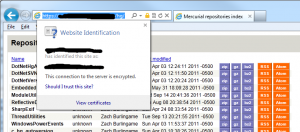
    Once there, I clicked on the “Security Report” lock icon next to the URL and selected “View Certificates”.

    IE Security Report
    IE Security Report

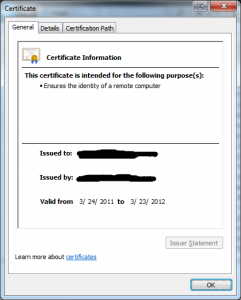
    Which brings up a window like this:
    View Certificate
    View Certificate

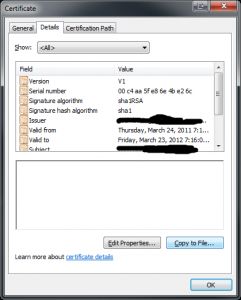
    You then click on the “Details” tab and select “Copy to File”:
    View Certificate - Copy to File
    View Certificate – Copy to File

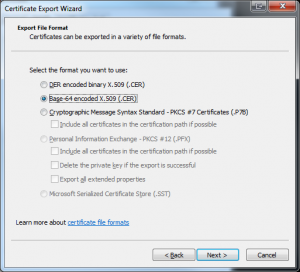
    In the “Certificate Export Wizard”, it’s important that you select the “Base-64 encoded X.509(.CER)” format as this is the format used by the cacert.pem file.
    Certificate Export Wizard
    Certificate Export Wizard

    Then it’s simply a matter of going to the TeamCity build server and opening the cacert.pem located in

    C:\Program Files\TortoiseHg\hgrc.d\cacert.pem

    and adding a name for the cert followed by the contents of the .cer saved in the previous step. For example:

    mercurial.mydomain.com
    =======================
    —–BEGIN CERTIFICATE—–
    MIICWjCCAcMCAgGlMA0GCSqGSIb3DQEBBAUAMHUxCzAJBgNVBAYTAlVTMRgwFgYDVQQKEw9HVEUg
    Q29ycG9yYXRpb24xJzAlBgNVBAsTHkdURSBDeWJlclRydXN0IFNvbHV0aW9ucywgSW5jLjEjMCEG
    A1UEAxMaR1RFIEN5YmVyVHJ1c3QgR2xvYmFsIFJvb3QwHhcNOTgwODEzMDAyOTAwWhcNMTgwODEz
    MjM1OTAwWjB1MQswCQYDVQQGEwJVUzEYMBYGA1UEChMPR1RFIENvcnBvcmF0aW9uMScwJQYDVQQL
    Ex5HVEUgQ3liZXJUcnVzdCBTb2x1dGlvbnMsIEluYy4xIzAhBgNVBAMTGkdURSBDeWJlclRydXN0
    IEdsb2JhbCBSb290MIGfMA0GCSqGSIb3DQEBAQUAA4GNADCBiQKBgQCVD6C28FCc6HrHiM3dFw4u
    sJTQGz0O9pTAipTHBsiQl8i4ZBp6fmw8U+E3KHNgf7KXUwefU/ltWJTSr41tiGeA5u2ylc9yMcql
    HHK6XALnZELn+aks1joNrI1CqiQBOeacPwGFVw1Yh0X404Wqk2kmhXBIgD8SFcd5tB8FLztimQID
    AQABMA0GCSqGSIb3DQEBBAUAA4GBAG3rGwnpXtlR22ciYaQqPEh346B8pt5zohQDhT37qw4wxYMW
    M4ETCJ57NE7fQMh017l93PR2VX2bY1QY6fDq81yx2YtCHrnAlU66+tXifPVoYb+O7AWXX1uw16OF
    NMQkpw0PlZPvy5TYnh+dXIVtx6quTx8itc2VrbqnzPmrC3p/
    —–END CERTIFICATE—–

    Save the file and then in a minute or so (by default the VCS check interval for TeamCity is 60s) you should see big smiles from TeamCity (or at least no more VCS errors)!

    Teamcity Mercurial over HTTPs
    Teamcity Mercurial over HTTPs

  • Setting the sticky bit recursively on directories only

    This is more of a reminder for me.

    Several times recently I’ve run into problems where files in a MultiUser Mercurial repository on a linux host are getting the wrong group permissions. If you properly set the group sticky bit when you first setup the repo, you won’t have this issue. To fix the issue, I needed to set the sticky bit on every directory in the .hg/store directory recursively.

    find /path/to/.hg/store/ -type d -exec chmod g+s {} \;

  • HTTP File Download Reassembly in WireShark with Chunked Transfer Encoding

    I was having problems with binaries I was downloading with a particular application the other day. As part of the debugging process at one point, I was taking packet captures with Wireshark inside the client LAN, at the client router’s WAN, and tcpdump from the server. I was then reassembling the file from the stream in each packet capture and comparing them to see where the corruption was occurring relative to the copy that resided on the server.

    To accomplish this, I was going to the HTTP GET message packet in Wireshark. Then I would right-click on the packet and select Follow Stream. Next I would select only the direction of traffic from the server to the client (since this was a download). Then I would make sure RAW was selected and save the file. Finally I would open the file up in a hex editor, remove the HTTP header that winds up prepended to the file, and save it. Annnnd then the file was corrupted.

    Doing a binary diff of a valid copy of the file with the reconstructed file using 010 Editor I could see that the only differences were several small sections of the file with values like these spaced throughout the file:

    Hex: 0D 0A 31 30 30 30 0D 0A
    ASCII: \r\n1000\r\n

    and one of these at the end of the file:

    Hex: 0D 0A 00 00 0D 0A
    ASCII: \r\n00\r\n

    I confirmed that each of the packet captures at the various points along the way all had the same result. Where the heck was this random data getting injected into my stream and better still, why?!

    The first clue that it wasn’t truly random data was the \r&#92n values. Carriage Return – Line Feed (CRLF) is a staple demarcation value in the HTTP protocol. My second clue was that the values were typically 1000 and 0. Although respresented with ASCII codes in the file, if you interpret them as hex they are 4096 and 0. When doing buffered I/O a 4K buffer is very common as is getting a 0 back from a read function when you reach EOF.

    As it turns out, the particular behavior I was seeing was a feature of the HTTP/1.1 Protocol called Chunked Transfer Encoding. The wikipedia article does a great job explaining it, but basically it allows for content to be sent prior to knowing the exact size of that content. It does this by prepending the size to the each chunk:

    The size of each chunk is sent right before the chunk itself so that a client can tell when it has finished receiving data for that chunk. The data transfer is terminated by a final chunk of length zero.

    Ah-ha! So my naïve manual file reconstruction from the Wireshark packet capture of the HTTP download was flawed. Or was it? I checked the file on disk and sure enough it too had these extra data values present.

    Once again, Wikipedia to the rescue (emphasis mine):

    For version 1.1 of the HTTP protocol, the chunked transfer mechanism is considered to be always acceptable, even if not listed in the TE request header field, and when used with other transfer mechanisms, should always be applied last to the transferred data and never more than one time

    The server was utilizing chunked transfer encoding but the application I was using wasn’t fully HTTP/1.1 compliant and was thus doing a naïve reconstruction just like me! So, if you find yourself doing file reconstruction from packet captures of HTTP downloads, make sure you take chunked transfer encoding into account.

  • HOWTO: Enable Wireless Networking on Boot in Ubuntu Linux without NetworkManager

    Building on my previous post, this is how to enable wireless networking on boot without NetworkManager.

    I’m using WPA in this example, but the setup is similar for WEP and WPA2 using wpa_supplicant.

    Remove NetworkManager (Optional)

    sudo apt-get remove network-manager

    Setup WPA Supplicant

    To convert the WPA passphrase into the appropriate form (which is salted with the SSID), you need to use wpa_passphrase. For example:

    wpa_passphrase my_ssid my_secret_password

    Generates:

    network={
    ssid=”my_ssid”
    #psk=”my_secret_password”
    psk=6bea99c21cff6002adc637d93a47fba760ec5e6326cb41784c597b6691ed700d
    }

    Using this information, you need to setup /etc/wpa_supplicant.conf like so:

    ap_scan=1
    network={
    ssid=”my_ssid”
    #psk=”my_secret_password”
    psk=6bea99c21cff6002adc637d93a47fba760ec5e6326cb41784c597b6691ed700d
    }

    Enable Wireless Interface

    Put an entry in /etc/network/interfaces for wlan0 (or wlan1, or whatever your wireless interface is).

    NOTE: I’ve put the DHCP option here for completeness, but I ran into problems with a Belkin USB F5D9050 wireless adapter not getting an IP successfully, even after it associated with the AP. I’m not sure if this was a problem with the device, the linux driver, or the AP. I ended up adding a DHCP reservation on the AP and then using a static IP configuration on the server.

    Option 1: DHCP

    auto wlan0
    iface wlan0 inet dhcp

    Option 2: Static IP

    auto wlan0
    iface wlan0 inet static
    address 192.168.0.20
    gateway 192.168.0.1
    netmask 255.255.255.0
    network 192.168.0.0
    broadcast 192.168.0.255
    wpa-driver wext
    wpa-conf /etc/wpa_supplicant.conf

    Debugging

    If you are having issues getting this to work, one debugging trick is to start up wpa_supplicant directly in the foreground and checking the output of dmesg and /var/log/syslog for additional details.

    sudo wpa_supplicant -Dwext -iwlan0 -c/etc/wpa_supplicant.conf -dd
    
  • HOWTO: Enable Wired Networking on Boot in Ubuntu Linux without NetworkManager

    A lot of Linux distros are going to applet-based management of their network connections in their desktop flavors. For example, Ubuntu Linux Desktop Edition has been using the Gnome applet NetworkManager since at least 9.10 Karmic Koala. While it works great most of the time, I’ve run into issues with it several times.

    UPDATE:I believe this issue may have gone away with recent versions of NetworkManager.
    The first was that (at least with 9.10) while NetworkManager was running from boot, it didn’t start receiving commands to connect until the user initiated their Gnome session by logging in. If you wanted to run an SSH server on the machine, you wouldn’t be able to connect to it until a local user logged in.

    The second issue is that I often times end up using the Desktop Edition in a server-like capacity and turn gdm/X off entirely. The Desktop Edition has a shorter-lead time for package updates (which can be both a blessing and a curse). In my experience it’s also easier to find help/info on it versus the Server Edition. I recently setup a machine to act as a server for my dad, connecting to his weather station’s base station and uploading the results online. I ended up using the Desktop Edition of 11.04 because the server version didn’t have support out-of-the-box for some of his hardware.

    Anyways, while I found it maddening to find a solution to initially, like many things Linux, once you know the magic incantation to recite, it’s cake.

    Remove NetworkManager

    This is optional and many of you may want or need to keep it around. For me, in the cases where I need to use this at all, I find it easier just to completely remove NetworkManager from the picture.

    sudo apt-get remove network-manager
    

    Enable Wired Interface

    Put an entry in /etc/network/interfaces for eth0 (or eth1, or whatever your wired interface is).

    Option 1: DHCP

    auto eth0
    iface eth0 inet dhcp

    Option 2: Static IP

    auto eth0
    iface eth0 inet static
    address 192.168.0.10
    gateway 192.168.0.1
    netmask 255.255.255.0
    network 192.168.0.0
    broadcast 192.168.0.255

    Now your network interface should come up on boot, without NetworkManager!

  • HOWTO: Disable IPv6 in Ubuntu Linux

    Although we are edging closer to wide-spread IPv6 adoption with milestones such as World IPv6 Day, we aren’t quite there yet. Since I don’t use IPv6 on my LAN, I prefer to disable it. These instructions were written with Ubuntu 11.04, but it should work for 9.x,10.x, and probably many other distros as well.

    Check if IPv6 is enabled

    cat /proc/sys/net/ipv6/conf/all/disable_ipv6

    0 means IPv6 is Enabled while 1 indicates that IPv6 is Disabled

    Disable IPv6

    Add the following to /etc/sysctl.conf

    net.ipv6.conf.all.disable_ipv6 = 1
    net.ipv6.conf.default.disable_ipv6 = 1
    net.ipv6.conf.lo.disable_ipv6 = 1

    Reboot!

  • Keeping Applications Up-to-Date on Windows Systems

    With so many applications installed on your machine and with many of us having multiple machines, keeping them up-to-date is a real PITA and chews up a lot of time. Microsoft has helped us out a lot with automatic updates to Windows, .NET, Office, Microsoft Security Essentials, SQL Server, and several other applications. Other applications like the JRE and Adobe Acrobat Reader have added automatic application updating as well, but there are still numerous applications on most machines (a quick look at one of my machines shows over 139 applications!) that require at least manual update installations, if not manual update checks as well.

    Enter Secunia’s Personal Software Inspector (PSI). Free for personal use, this application detects and installs missing security patches for hundreds of different Windows applications. For many applications it can offer to install the updates automatically and when it can’t, it can link you directly to where you need to go to get the update. If there is an application that isn’t currently supported by PSI, it’s very easy to submit a request to Secunia to have it added by clicking the “Are you missing a program?” link on the “Scan Results” page.

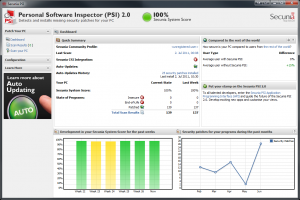
    PSI gives you a nice dashboard with some historical “Secunia Score” tracking.

    Secunia Dashboard
    Secunia PSI Dashboard

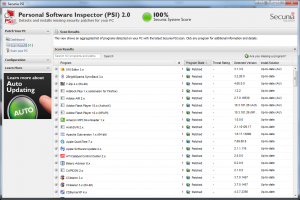
    The meat of the application is the “Scan Results” page which shows you a list of applications you have installed that it can monitor, the current version you have installed, whether it’s up-to-date or not, and where the application is installed.

    Secunia Scan Results
    Secunia PSI Scan Results

    Occasionally I have to go in and manually remove an old instance of an application (old JDK version, Google Chrome instances, etc.) to get the patch level to 100%, even though I’m only using the latest version. I’ve been running this on several of my machines for close to a year now, and overall I’ve found it to be a real time saver.

  • Windows Updates for Offline Machines or Slow Connections

    I needed to upgrade someones computer to Windows 7 and they had a very slow internet connection. To save time, I wanted to download all of the updates ahead of time so I wouldn’t have to wait an eternity for them when I was on-site. I initially considered setting up a WSUS server inside a VM but stumbled across another solution in the process: WSUS Offline Update.

    I simply downloaded and extracted the zip file to an external hard drive, ran UpdateGenerator.exe, selected the products I wanted and then let it eat overnight to download all the packages. I then took the external hard drive with me, attached it to the machine after I installed the OS, ran the UpdaterInstaller.exe (located in the client directory) and in very short order had (almost) all the Microsoft Windows, .NET, VC++ Redistributable, and Office updates installed. On a Windows 7 Professional x86 machine, Windows Update still found about 18 packages totaling 38MB that needed to be downloaded after WSUS Offline Update had done its thing. Not perfect but sure beats downloading a gig+ over a slow connection.

    I’ve also used the app to update new VMs when I create them, as it’s still faster getting them off the disk than the internet, even with a fast connection.

  • Ubuntu 11.04 Natty Narwhal Upgrade – Grub Prompt on First Reboot

    I just updated one of my VMs from Ubuntu 10.10 to 11.04 Natty Narwhal using the Update Manager. All seemed to go well during the upgrade process. When it rebooted for the first time however, I was left with a grub prompt rather than a booting system. Grrrrrr.

    NOTE: The following assumes the default disk layout. If you installed to a different disk or partition, you’ll have to adjust the steps below accordingly.

    The fix is to manually boot the system at the grub prompt by typing

    set root=(hd0,1)
    linux /boot/vmlinux-2.6.38-8-generic root=/dev/sda1 ro
    initrd /boot/initrd.img-2.6.38-8-generic
    boot

    Then once you are successfully booted, re-install grub like this:

    sudo grub-install /dev/sda
    sudo update-grub

    Thanks to Rob Convery for the tip!