Category: Version Control

  • Using Mercurial over HTTPS with TeamCity

    Uh oh, it’s b0rked

    I use Mercurial as my VCS for all my personal projects and JetBrains TeamCity for my build server. Naturally, I need TeamCity to talk to the VCS. There are two basic ways you can serve Mercurial repos: over HTTP(S) using something like hgweb.cgi and over SSH. I use SSH with public key authentication for all of my development boxes and it works great. However, SSH public key auth requires that I have a full-blown shell account on the VCS server. I really didn’t want to have a shell account dedicated for the TeamCity user, so I preferred using HTTPS. Starting with 1.6.4, Mercurial began (smartly) verifying SSL certificates. This coupled with my use of self-signed certificates caused me to get errors in TeamCity from Mercurial when it was trying to pull from the VCS server:

    ‘cmd /c hg pull https://mercurial.mydomain.com/hg/ModuleUtilities’
    command failed.
    stderr: abort: error: _ssl.c:490: error: 14090086:SSL
    routines:SSL2_GET_SERVER_CERTIFICATE:certificate verify failed
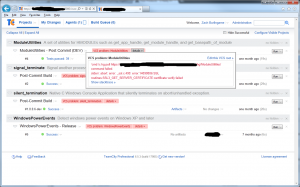
    Teamcity Mercurial Error
    Teamcity Mercurial Error

    Ahh, I think I know what’s going on here…

    The fix for this actually fairly simple: add the self-signed cert to the trusted chain. The tricky bit however, is that Mercurial doesn’t use the Windows certificate store so adding an entry like you would for say, Internet Explorer, won’t work. Instead, Mercurial uses a cacert.pem file. For these instructions, I’m using TortoiseHg as my Mercurial client on the build server. The basic concept however, applies regardless of the specific client so it should be fairly easy to adapt to your environment.

    A Walk-through the park

    The first step is to get the necessary certificate information. I did this by browsing to the URL of one of the repositories in Internet Explorer. For example:

    https://mercurial.mydomain.com/hg/myrepo

    Once there, I clicked on the “Security Report” lock icon next to the URL and selected “View Certificates”.
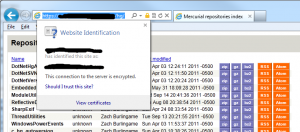
    IE Security Report
    IE Security Report

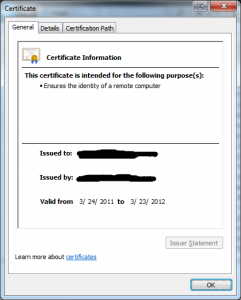
    Which brings up a window like this:
    View Certificate
    View Certificate

    You then click on the “Details” tab and select “Copy to File”:
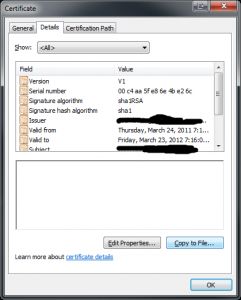
    View Certificate - Copy to File
    View Certificate – Copy to File

    In the “Certificate Export Wizard”, it’s important that you select the “Base-64 encoded X.509(.CER)” format as this is the format used by the cacert.pem file.
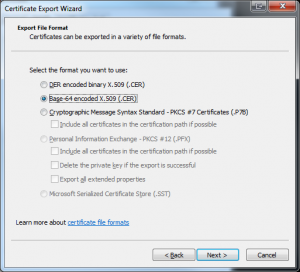
    Certificate Export Wizard
    Certificate Export Wizard

    Then it’s simply a matter of going to the TeamCity build server and opening the cacert.pem located in

    C:\Program Files\TortoiseHg\hgrc.d\cacert.pem

    and adding a name for the cert followed by the contents of the .cer saved in the previous step. For example:

    mercurial.mydomain.com
    =======================
    —–BEGIN CERTIFICATE—–
    MIICWjCCAcMCAgGlMA0GCSqGSIb3DQEBBAUAMHUxCzAJBgNVBAYTAlVTMRgwFgYDVQQKEw9HVEUg
    Q29ycG9yYXRpb24xJzAlBgNVBAsTHkdURSBDeWJlclRydXN0IFNvbHV0aW9ucywgSW5jLjEjMCEG
    A1UEAxMaR1RFIEN5YmVyVHJ1c3QgR2xvYmFsIFJvb3QwHhcNOTgwODEzMDAyOTAwWhcNMTgwODEz
    MjM1OTAwWjB1MQswCQYDVQQGEwJVUzEYMBYGA1UEChMPR1RFIENvcnBvcmF0aW9uMScwJQYDVQQL
    Ex5HVEUgQ3liZXJUcnVzdCBTb2x1dGlvbnMsIEluYy4xIzAhBgNVBAMTGkdURSBDeWJlclRydXN0
    IEdsb2JhbCBSb290MIGfMA0GCSqGSIb3DQEBAQUAA4GNADCBiQKBgQCVD6C28FCc6HrHiM3dFw4u
    sJTQGz0O9pTAipTHBsiQl8i4ZBp6fmw8U+E3KHNgf7KXUwefU/ltWJTSr41tiGeA5u2ylc9yMcql
    HHK6XALnZELn+aks1joNrI1CqiQBOeacPwGFVw1Yh0X404Wqk2kmhXBIgD8SFcd5tB8FLztimQID
    AQABMA0GCSqGSIb3DQEBBAUAA4GBAG3rGwnpXtlR22ciYaQqPEh346B8pt5zohQDhT37qw4wxYMW
    M4ETCJ57NE7fQMh017l93PR2VX2bY1QY6fDq81yx2YtCHrnAlU66+tXifPVoYb+O7AWXX1uw16OF
    NMQkpw0PlZPvy5TYnh+dXIVtx6quTx8itc2VrbqnzPmrC3p/
    —–END CERTIFICATE—–

    Save the file and then in a minute or so (by default the VCS check interval for TeamCity is 60s) you should see big smiles from TeamCity (or at least no more VCS errors)!
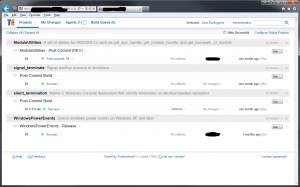
    Teamcity Mercurial over HTTPs
    Teamcity Mercurial over HTTPs

  • HOWTO: Generate and Publish Doxygen Documentation in TeamCity

    I’ve started using Doxygen and JavaDoc style comments on my native C/C++ applications for documentation generation. In keeping with my goal to have everything “just work” on checkout with minimal dependencies (ideally just Visual Studio and version control) I wanted to get it integrated directly into the project. That way anyone can generate the latest version of the documentation from their working copy whenever they need it. Since I use TeamCity for my continuous integration server, it was natural to have the CI server generate and publish the latest documents during the build process.

    Setup Doxygen

    Setup Doxygen in a Working Copy of your Project

    1. Download the Windows Doxygen zip package
    2. Create build/doxygen/bin
    3. Place DoxyFile in build/doxygen/
    4. Create build.xml in build/doxygen/
    5. +---build
      |   \---doxygen
      |       \---bin
      +---code
      \---documentation
      

      build.xml

      <?xml version="1.0" encoding="utf-8"?>
      <Project ToolsVersion="3.5" DefaultTargets="Doxygen" 
      xmlns="http://schemas.microsoft.com/developer/msbuild/2003">
        <PropertyGroup>
          <OutputDirectory>..\..\documentation\doxygen\</OutputDirectory>
        </PropertyGroup>
        <Target Name="Doxygen">
          <MakeDir Directories="$(OutputDirectory)" />
          <Exec Command="bin\doxygen.exe" />
        </Target>
      </Project>
      
    6. Test the script using MSBuild in a Visual Studio Command prompt
    7. [batch]
      cd /path/to/project/build/doxygen
      msbuild build.xml
      [/batch]

    8. Add the documentation/doxygen output folder to your VCS ignore pattern. (e.g. for Mercurial, add the following to the .hgignore file)
    9. glob:documentation/doxygen/*
      
    10. Add the all the files (including doxygen.exe, build.xml, and DoxyFile) to version control, commit the changes and publish them to the master repo (e.g. for Mercurial)
    11. [batch]
      hg add
      hg commit -m"Added Doxygen"
      hg push ssh://user@reposerver://srv/hg/project
      [/batch]

    Setup Public Key Authentication

    The following steps must be done on the BUILD SERVER. If you have multiple build servers/build agents for TeamCity, then you’ll need to duplicate most of these steps on each one. Alternatively, you can use a shared RSA key.

    Generate an RSA public/private key pair

    1. Download and Install PuTTY.Look under “A Windows installer for everything except PuTTYtel”
    2. Open puttygen
    3. Click Generate
    4. Click Save Private Key
    5. Choose a location to save (I’ll use C:\keys for this example)
    6. Name the file (I’ll use buildserver.ppk for this example)
    7. Click Save Public Key
    8. Choose the same location used for the private key
    9. Name the file (I’ll use buildserver.pub for this example)

    The following steps must be done on the WEB SERVER

    Add an account for the buildserver

    sudo useradd buildserver
    

    Setup public key authentication for the user

    1. Setup the necessary files, directories, and permissions
    2. su buildserver
      mkdir ~/.ssh
      chmod 700 ~/.ssh
      touch ~/.ssh/authorized_keys
      chmod 600 ~/.ssh/authorized_keys
      vim ~/.ssh/authorized_keys
      
    3. In PuTTYGen, copy the entire contents of the box labeled: “Public key for pasting into OpenSSH authorized_keys file:”
    4. Paste the contents into authorized_keys on the Web Server and save the file.

    Setup Rsync

    The following steps must be done on the BUILD SERVER.
    Since Windows doesn’t natively have rsync, I use the cygwin packaged cwrsync.

    1. Download cwrsync http://www.itefix.no/i2/cwrsync
    2. I ran into problems with cwrsync being used in conjunction with plink where I received the following error:

      “Unable to read from standard input: The parameter is incorrect.”

      The problem apparently is when cygwin programs use redirected stdin/stdout handles. The solution I found to this was to use cygnative. From their website:

      Cygnative.exe is a wrapper for cygwin programs which call native Win32 programs with stdin and/or stdout handle redirected. Without cygnative.exe it is possible that the native program can not read from the handle and receives a “invalid handle” error.

    3. Download cygnative
    4. Create a script which will call cwrsync and pipe the rsync over an SSH connection from the build server to the web server.
    5. I placed this script during testing in project\build\doxygen\cwrsync.cmd I was only using it for testing before I put it into a TeamCity build step so I had no plans of commiting it to source control since it ultimately needs the private key which I don’t want in version control. If you aren’t going to use a TeamCity build step to publish the documentation, you can use this script as a starting point for your solution.

      [batch]
      @ECHO OFF
      REM *****************************************************************
      REM
      REM CWRSYNC.CMD – Batch file template to start your rsync command (s).
      REM
      REM By Tevfik K. (http://itefix.no)
      REM *****************************************************************
      REM Make environment variable changes local to this batch file
      SETLOCAL

      SET LOCAL_DIR=../../documentation/doxygen/html
      SET REMOTE_SERVER=yer_remote_machine_name
      SET REMOTE_USER=yer_remote_user_name
      SET REMOTE_DIR=/var/cache/doxygen/yer_project_name
      SET SSH_KEY=yer_ssh_key
      SET RSYNC_ARGS=-arz
      SET PLINK_CMD=cygnative plink -i %SSH_KEY% -batch
      SET REMOTE_CHMOD=chmod -R a+rx %REMOTE_DIR%

      REM Specify where to find rsync and related files (C:\CWRSYNC)
      SET CWRSYNCHOME=%PROGRAMFILES(x86)%\CWRSYNC

      REM *****************************************************************
      REM Don’t Change Below This Line
      REM *****************************************************************

      REM Set HOME variable to your windows home directory. That makes sure
      REM that ssh command creates known_hosts in a directory you have access.
      SET HOME=%HOMEDRIVE%%HOMEPATH%

      REM Make cwRsync home as a part of system PATH to find required DLLs
      SET CWOLDPATH=%PATH%
      SET PATH=%CWRSYNCHOME%\BIN;%PATH%

      REM Publish the files
      rsync %RSYNC_ARGS% -e "%PLINK_CMD%" "%LOCAL_DIR%" %REMOTE_USER%@%REMOTE_SERVER%:%REMOTE_DIR%

      REM Fix the permissions on the files
      %PLINK_CMD% %REMOTE_USER%@%REMOTE_SERVER% %REMOTE_CHMOD%
      [/batch]

      In a command prompt, cd to the directory that the cwrsync.cmd script is and run it

      cd /path/to/cwrsync/script/
      cwrsync.cmd
      

      It should ‘just work’. If you get an error running the script or your Web Server isn’t serving up the content, try turning up the verbosity of plink and and rsync by adding -v like this:

      SET RSYNC_ARGS=-arzvvvv
      SET PLINK_CMD=cygnative plink -v -i %SSH_KEY% -batch
      

    Configure TeamCity

    1. Create a build step to generate the documentation using the build.xml file created earlier in your project’s build configuration.
    2. Runner type: MSBuild
      Build file path: build\doxygen\build.xml
      Working Directory:
      MSBuild version: Microsoft .NET Framework 4.0
      MSBuild ToolsVersion: 4.0
      Run platform: x86
      Targets: Doxygen
      Command line parameters:
      Reduce test failure feedback time:
      .NET Coverage tools:
      Report type:

      Click “Save”

    3. Create a build step to publish the documentation to the web server.
    4. Rather than use a CMD file in version control or pushing it out to all the build agents, I prefer to use a build step in the build configuration for the project in TeamCity. To use the script in the TeamCity build step, you have to use %% rather than % because TeamCity will treat the % as a TeamCity build property.

      Runner type: Command Line
      Working directory:
      Run: Custom Script
      Custom script: < the contents of your cwrsync.cmd from earlier, with every '%' replaced with '%%' >
      Report type:

      Click “Save”

    5. Run your build and verify that everything works!

    References

  • HOWTO: Upgrade from Subversion 1.4 to 1.6 on CentOS 5

    How to upgrade the packages and existing repositories from Subversion 1.4 to 1.6.6 on CentOS 5.

    # File: Subversion_1.6_Upgrade.notes
    # Auth: burly
    # Date: 12/01/2009
    # Refs: http://svnbook.red-bean.com/nightly/en/index.html
    #       http://dev/antoinesolutions.com/subversion
    # Desc: Upgrading from subversion 1.4 to 1.6.6 on CentOS 5
    #       NOTE:These instructions are actually fairly generic 
    #       in regards to the version of SVN you are upgrading
    #       from/to. At the time of writing, it just happened
    #       to be 1.4 -> 1.6.6
    
    # Backup each repository
    svnadmin dump /srv/svn/<repo> > /backup/svn/<Repo>_20091201_rXXXX.dump
    
    # Backup any hooks or configuration files in 
    # /srv/svn/<repo>/hooks and /srv/svn/conf
    
    # Setup yum to allow the package to come in from
    # RPMforge (must setup RPMforge repo first).
    vim /etc/yum.repos.d/Centos-Base.repo
    
    # Add the following line at the end of each section
    # in the Centos-Base.repo
    exclude=subversion mod_dav_svn
    
    # Restart the yum update daemon
    service yum-updatesd restart
    
    # Upgrade subversion
    yum upgrade subversion
    
    # For each repository
    #    delete the existing repo
    rm -rf /srv/svn/<repo>
    
    # Create a new repo
    svnadmin create /srv/svn/<repo> --fs-type fsfs
    
    # Import the data
    svnadmin load /srv/svn/<repo> < /backup/srv/<Repo>_20091201_rXXXX.dump
    
    # Restore any hooks or configuration files in 
    # /srv/svn/<repo>/hooks and /srv/svn/<repo>/conf
    
    # If you are using Trac, you'll need to resync the repo
    trac-admin /srv/trac/<repo> resync
    
  • HOWTO: Extract Directory from Mercurial Repo with Full History

    Extract a directory out of an existing Mercurial repo into a new, top level repo with full revision history. For example, you have:
    <Project A>/<sub project B>
    and you want to make <sub project B> its own repo.

    # File: HOWTOExtractDirectoryIntoStandaloneRepoMercurial.notes
    # Auth: burly
    # Date: 03/01/2011
    # Refs: http://mercurial.selenic.com/wiki/ConvertExtension
    #       http://www.jmedved.com/2010/09/extracting-part-of-mercurial-repository/
    # Desc: Extract directory out of an existing Mercurial repo into
    #       a new, top level repo with full revision history.
    #       e.g. You have <Project A>/<sub project B> and 
    #       you want to make <sub project B> it's own repo.
    
    #Enable hg convert
    vim ~/.hgrc
    
    ######## BEGIN COPY BELOW THIS LINE ###########
    [extensions]
    convert =
    ########## END COPY ABOVE THIS LINE ############
    
    # Clone the repo you want to extract from
    mkdir ~/tmp
    cd ~/tmp
    hg clone /path/to/yer/repo-to-clone
    
    # Make a filemap of the items you want to keep. 
    vim filemap.txt
    
    ########## BEGIN COPY BELOW THIS LINE #########
    include WindowsPowerEvents
    rename WindowsPowerEvents .
    ############ END COPY ABOVE THIS LINE ########
    
    # Extract the desired folder with the convert extension
    hg convert --filemap filemap.txt repo-to-clone new-repo-name
    
    # (Optionally) Import this repo into the primary location you want it
    cd /path/to/primary/repo/location
    hg pull ~/tmp/new-repo-name
    
  • TortoiseSVN Cache (TSVNCache.exe) and Disk I/O

    I’ve had a long standing fight with TortoiseSVN‘s TSVNCache.exe both in terms of disk I/O performance and it holding locks to files/folders I want to work with. Turns out that you can set which directories it watches with an include/exclude list under Settings->Icon Overlays.

    Thanks to Travis Illig for the blog post on this issue: http://www.paraesthesia.com/archive/2007/09/26/optimize-tortoise-svn-cache-tsvncache.exe-disk-io.aspx

    For what it’s worth, my patterns are:

    Exclude: C:\*
    Include:
    C:\Users\<username>\Documents\Visual Studio 2008\Projects\*
    C:\Users\<username>\Documents\Visual Studio 2010\Projects\*

    Note the trailing ‘\*’, which seemed necessary to get it working for me. I killed TSVNCache.exe after saving the preference changes and then went to some SVN working copy folders. I watched TSVNCache.exe briefly in procmon and it seems that it’s only accessing the specified directories now.

  • TortoiseHg Version 2.0 Upgrade Gotcha

    I just upgraded to version 2.0 of TortoiseHg the other day and started running into these errors when I went to clone repos out of bitbucket using SSH:

    remote: The system cannot find the path specified.
    abort: no suitable response from remote hg!

    Turns out that on 64-bit Windows machines the install directory changed from C:\Program Files (x86)\TortoiseHg to C:\Program Files\TortoiseHg. As a result, the location of TortoisePlink has changed and needs to be updated in your mercurial.ini file (located in your %USERPROFILE% directory) as such:

    ssh = "C:\Program Files\TortoiseHg\TortoisePlink.exe" -ssh -2 -batch -C

    A huge thank you goes to Igal Tabachnik for posting a solution to this here.

  • Installing Mercurial and Hosting Repositories with CentOS

    In the previous post I discussed some things to consider when publishing mercurial repositories. Here I explain the steps I took to setup and configure Mercurial repository publishing via SSH and HTTPS on CentOS 5.5 x64.

    Prerequisites

    These are the prereqs for my setup. Most of these instructions will probably work on other distros and web servers, but the exact commands and details will vary.

    • CentOS 5.5
    • Apache 2.x (Installed and Configured)
    • root or sudo access on the server
    • Internet Connection during installation (yes, some of us do development on offline networks)

    Download and Install Packages

    The mercurial packages that are available directly out of the CentOS repositories and RPMForge for CentOS 5.5 were too old for my liking. I downloaded the latest RPMs (at the time of writing) directly. Update 2011/03/30: Mercurial 1.8.x is now in RPMForge for EL5 so you can get it directly via yum.

    sudo yum install python-docutils python-setuptools mercurial mercurial-hgk mercurial-ssh
    
    I ran into an dependency resolution issue because I have the EPEL repo enabled with a higher priority than RPMForge. I added the following line to the [epel] entry in /etc/yum.repos.d/epel.repo to force yum to look for mercurial elsewhere so it pulled from RPMForge.
    exclude=mercurial,mercurial-hgk,mercurial-ssh
    

    Create an hg Group

    I find it useful to create a group for all of the version control users on the server because I want to support both HTTPS and SSH access. If you are using HTTPS access only, then you don’t need a group here since it will all be done via apache. I used hg here but you could use anything you want like vcs or versioncontrol.

    sudo groupadd hg
    # Add all committers to the hg group using usermod
    

    Create and Configure a Repo

    Note that I go through a few extra hoops here to allow multiple-committers since I want to support both SSH and HTTPS access.

    # Create your new Hg repo (or copy the existing one) in /srv/hg
    sudo hg init /srv/hg/
    
    # Make the repo writable by the group for a multiple-committers environment
    cd /srv/hg/
    sudo chgrp hg .hg .hg/* .hg/store/*
    sudo chmod g+w .hg .hg/* .hg/store/*
    sudo chmod g+s .hg .hg/* .hg/store/data
    
    # Give ownership of Hg repos to the apache user
    sudo chown -R apache /srv/hg/
    
    # Setup your .hgignore file to handle files you don't want under version control
    
    # Add your project files to the repo
    hg add
    
    # Commit your project
    hg commit
    

    Setup HgWeb

    There is great documentation on how to do this on the Mercurial Wiki but here are the steps I used.

    # Setup Hgweb for HTTP access using mod_python
    sudo mkdir /etc/hgweb
    sudo mkdir /var/hg
    
    sudo vim /var/hg/hgwebdir.py
    ########## BEGIN COPY BELOW THIS LINE ###########
    #!/usr/bin/env python
    #
    import cgitb
    cgitb.enable()
    
    from mercurial.hgweb.hgwebdir_mod import hgwebdir
    from mercurial.hgweb.request import wsgiapplication
    import mercurial.hgweb.wsgicgi as wsgicgi
    
    def make_web_app():
        return hgwebdir("/etc/hgweb/hgwebdir.conf")
    
    def start(environ, start_response):
        toto = wsgiapplication(make_web_app)
        return toto (environ, start_response)
    ############ END COPY ABOVE THIS LINE ############
    
    sudo vim /etc/hgweb/hgwebdir.conf
    ######### COPY BELOW THIS LINE #############
    [collections]
    /srv/hg = /srv/hg
    
    [web]
    style = gitweb
    allow_archive = bz2 gz zip
    contact = Your Name, your.email@address.com
    allow_push = *
    push_ssl = true
    ######## END COPY ABOVE THIS LINE ###########
    

    Setup modpython_gateway

    We need a dynamic landing page to handle access to the collection of all repos available on the box rather. This way we don’t have to setup a static landing page for each and every repo we publish. I’m using the ever popular modpython_gateway script for this.

    wget http://www.aminus.net/browser/modpython_gateway.py?format=raw
    sudo mv modpython_gateway.py\?format\=raw /var/hg/modpython_gateway.py
    
    # IMPORTANT! Only use the -c flag for the FIRST person you add, drop it for every add after that
    sudo htdigest -c /etc/hgweb/users.htdigest "Zach's Mercurial Repository" burly
    
    sudo vim /etc/httpd/conf.d/hgweb.conf
    ######### BEGIN COPY BELOW THIS LINE ########
    
            PythonPath "sys.path + ['/var/hg']"
            SetHandler mod_python
            PythonHandler modpython_gateway::handler
            PythonOption wsgi.application hgwebdir::start
    
            AuthType Digest
            AuthName "Zach's Mercurial Repository"
            AuthDigestProvider file
            AuthUserFile "/etc/hgweb/users.htdigest"
    
            Require valid-user
    
            # Redirect all non-SSL traffic automagically
            RewriteEngine On
            RewriteCond %{HTTPS} off
            RewriteRule (.*) https://%{HTTP_HOST}%{REQUEST_URI}
    
    ####### END COPY ABOVE THIS LINE ##########
    

    Configure Apache

    We need to enable WSGI handling in apache and that we have all the right file permissions. If you don’t have a CA cert you’ll need to setup one up if you want to use SSL. Here is how to do that on CentOS.

    sudo vim /etc/httpd/conf/httpd.conf
    # Add the Following Lines in their Respective Locations in the Conf
    ####### BEGIN COPY BELOW THIS LINE ########
    LoadModule wsgi_module modules/mod_wsgi.so
    AddHandler wsgi-script .wsgi
    ####### END COPY ABOVE THIS LINE #########
    
    sudo chown -R root.root /etc/hgweb
    sudo chown apache.apache /etc/hgweb/users.htdigest
    sudo chmod 400 /etc/hgweb/users.htdigest
    sudo chown -R apache.apache /var/hg
    
    sudo service httpd restart
    

    Use your Repo!

    You should now be able to view your repositories by pointing your browser at http://yermachinenameorip/hg and you should be prompted for the username and password created in your htdigest file from earlier (i.e. not your shell account credentials). Note that due to the re-write rule in our hgweb.conf file, you should automatically be redirected to the SSL version of the site.

    You should now be able to clone your repo via https and your htdigest credentials via:

    hg clone https://@yermachinenameorip/hg/reponame

    or via SSH and your shell account credentials via:

    hg clone ssh://@yermachinenameorip/srv/hg/reponame

    Maintenance

    #--------------------------
    # Create a new project
    #--------------------------
    hg init /srv/hg/<reponame>
    
    # Make the repo writable by the group for a multiple-committers environment
    cd /srv/hg/<reponame>
    sudo chgrp hg .hg .hg/* .hg/store/*
    sudo chmod g+w .hg .hg/* .hg/store/*
    sudo chmod g+s .hg .hg/* .hg/store/data
    
    # Give ownership of Hg  repos to the apache user
    sudo chown -R apache /srv/hg/<reponame>
    
    hg add
    hg commit
    
    #--------------------------
    # Add a new user
    #--------------------------
    useradd  -G hg
    passwd
    
    # Set the htaccess password for the user
    htpasswd /etc/hgweb/users.htdigest
    

    Additional Resources

  • Things to Consider When Publishing Mercurial Repositories

    Shortcut: If you just want to know HOW I publish my repos locally and not all this babble on WHY, then jump to the post Installing Mercurial and Hosting Repositories with CentOS.

    I’ve been using Mercurial as my VCS of choice now for about six months and quite frankly I love it. There were a number of pain points for me with Subversion (although I still use it almost every day) that Hg addressed. One of the items that regularly comes up when switching to a DVCS like Hg is “Where is the central repository?” By the pure nature of a DVCS, there is no requirement to have one. It is often useful however, to have a master or authoritative repository that other developers or clones (more on this later) can use to sync with.

    Once you decide to have master a repo, the next question is “How do we access it?” With SVN this was typically accomplished through the use of HTTP with mod_dav or via svn+ssh. Mercurial comes with an utility called hgserve that will publish a repository for others to access, but it doesn’t provide any authentication methods so it’s really only viable on internal trusted networks. Fortunately, Mercurial also supports numerous other methods of publishing a repository. Additionally, there are a number of great repository hosting companies out there, including my personal favorites: BitBucket and Kiln.  I use BitBucket’s free service to host the source code used for posts on this blog and I use Kiln’s (which is so much more than just a source code hosting platform) free service for managing some personal projects.

    With all these great free online services, why do I want another repository?

    1. Build Server – I run a TeamCity build server for a number of my personal projects and I would rather it work with a local repository than pull it’s data down from the Internet for every build.
    2. Backup – While the online services certainly have a more robust configuration overall than my little personal server, my data is but drop in their huge bucket. It means a LOT to me though, so having some up-to-date master copy that I control makes me sleep a bit better at night. Furthermore web companies go out of business overnight sometimes, and I don’t want to get caught with my data at the mercy of some company’s financials.
    3. Security – Not all of the things I want under version control do I want out on the Internet. Whether it be some personal project or versioning of my configuration data, it’s nice to have a local sandbox to keep these things in.
    4. Fun – I AM a developer after all – this stuff is fun!

    There are 1,271,486 other articles out there on how to publish a Mercurial repository, why another?

    I have several specific requirements in how I want to deploy my setup and there was no single source that seemed to address them all. This is more for my own documentation purposes than anything else, but I figured hey, there may be 0.7 other people out there who might benefit from it as well! These requirements are:

    1. User Authentication – I definitely want to require user authentication to get access to the repositories. This knocks out the built-in hgserve. (Yes, it’s running on my internal network, but I’m paranoid like that.)
    2. Multiple Committers – I don’t want to use the same user account for everyone who accesses the repository (including the build server) and it’s plausible that I may give friends access to specific projects that come up from time to time.
    3. No server user shell accounts just for access to repositories – I don’t want to have to create a full-blown shell account on a system just to give a user access to a repository. This knocks out SSH-only solutions.
    4. No stored passwords in hg clients for users with shell accounts on the server – For those of us (like me) who DO have shell accounts on the server, I don’t want to be caching a stored password on my client machines. I would much rather use something like public-key authentication in a case like this. This knocks out hgweb-only solutions.
    5. Support for multiple-repositories – I want a solution that supports publishing and managing access for multiple repositories with minimal effort.

    Sidebar

    Of note on point three – using an SSH-based solution – is that this is creates a special hell for you when you go to setup a TeamCity Continuous Integration server (or any Windows Service based agent that is accessing your repository in an authenticated manner). You either have to provide a username and password to TeamCity when setting up the VCS Root, which will also correspond to a user login on your server (no, thank you!) or setup public-key authentication. The problem arises when you go to setup public-key auth: How do you get TortoiseHg’s plink the key? It turns out you can but it involves jumping through some mighty hoops. First you have to generate your key, securely transfer it to your build server, convert it to PuTTY’s PPK format, place it and a mercurial.ini file in the correct SYSTEM account’s profile directory deep in the bowels of the Windows directory based on the bitness of your TeamCity install, use PsExec to run plink as the system account to accept the host key and not run into any other problems along the way. Ew.

    The Hybrid-Solution

    I settled on a hybrid of Apache hgweb and SSH to meet all of my requirements. For those users who already have shell accounts, I can use public-key authentication to both securely access the repositories and avoid having stored passwords on the client machines. For those users who don’t have shell accounts (like the service running the TeamCity build server) I can use HTTPS to provide authenticated access in either a read-only or read-write manner. I’ll provide steps on how to do this in the next post: Installing Mercurial and Hosting Repositories with CentOS.

  • Integrating the Subversion Revision into the Version Automatically with .NET

    In our final post in this series, we’ll be discussing how to integrate the Subversion information into the file version automatically with .NET. Building on these previous posts, I’ll be discussing how to do this for a .NET project using Visual Studio 2010 Professional and TortoiseSVN.

    The source code for this post is available here.

    Step 1: Add a Version Project

    I find adding a specific Version project to the solution is beneficial. The reason is that we are generating common version info to be used across the entire solution, however the first project in the build order needs to be the one to generate this info. Depending on your project dependencies there may not be an obvious or good place to do this. By adding a Version project and making all other projects depend on it we have an easy place to generate the necessary files.

    1. Add a project named Version to your Solution
    2. Add a reference to Version from all the other projects in your Solution

    Step 2: Add a GlobalAssemblyInfo Template

    Create a file named GlobalAssemblyInfo.cs.tmpl in the Properties folder of the Version project. Copy the code below into the template and make any desired customizations to match your environment.

    Notice the $WCNOW$, $WCNOW$ and $WCMODS?M:$ tokens. We’ll use these to place the necessary Subversion information in the file we generate using SubWCRev.exe.

    // This file contains common AssemblyVersion data to be shared across all projects in this solution.
    using System.Reflection;
    
    [assembly: AssemblyCompany("Zach Burlingame")]
    [assembly: AssemblyProduct("DotNetSVNAutoVersion")]
    [assembly: AssemblyCopyright("Copyright © Zach Burlingame 2011")]
    [assembly: AssemblyTrademark("")]
    [assembly: AssemblyCulture("")]
    
    #if DEBUG
    [assembly: AssemblyConfiguration("Debug")]
    #else
    [assembly: AssemblyConfiguration("Release")]
    #endif
    
    // Version information for an assembly consists of the following four values:
    //
    //      Major Version
    //      Minor Version 
    //      Revision
    //      Build
    [assembly: AssemblyVersion("1.0.0.$WCREV$")]
    [assembly: AssemblyTitle("Built $WCNOW$ from r$WCREV$$WCMODS?M:$")] // This is visible as the "File Description" on the Details tab of the Explorer pane
    

    NOTE: Originally I also had set the AssemblyFileVersion in the template as well. However, for .NET projects, placing string data in this attribute will generate a warning (like the one below), unlike the FileVersionStr in native projects.

    [assembly: AssemblyFileVersion(“1.0.0.$WCREV$$WCMODS?M:$”)]
    Warning 1 Assembly generation — The version ‘1.0.0.118M’ specified for the ‘file version’ is not in the normal ‘major.minor.build.revision’ format Version

    Step 3: Using SubWCRev to Generate GlobalAssemblyInfo

    Next we need to add a pre-build step to our Version project to generate the GlobalAssemblyInfo.cs file from the template using the TortoiseSVN tool called SubWCRev.

    The extracted version info includes the revision number, the date time of the build and if there are any local modifications to the working copy. Note that in counter-intuitive fashion, the AssemblyTitle attribute is what sets the Description field when viewed from the Details tab of the Properties pane in Explorer. Meanwhile the AssemblyDescription field isn’t displayed at all and rather is only accessible through API calls against the binary. Why MS did this, I do not know…

    1. Right-click on the Version project
    2. Select Properties
    3. Select the Build Events tab
    4. In the Pre-build event command line box, enter:
      subwcrev.exe "$(SolutionDir)\" "$(ProjectDir)Properties\GlobalAssemblyInfo.cs.tmpl" "$(SolutionDir)Code\App\GlobalAssemblyInfo.cs"

    Step 4: Add a link to the GlobalAssemblyInfo.cs file in each project

    1. In Visual Studio, right-click on a project
    2. Select Add->Existing Item
    3. Browse to GlobalAssemblyInfo.cs
    4. Select the file
    5. Click the drop-down arrow next to Add and select Add As Link
    6. Move the link to your Properties folder (optional, but keeps things neat)

    Step 5: Update the AssemblyInfo.cs for each project

    In order to avoid duplicate annotations for assembly information, you must remove entries from the AssemblyInfo.cs file that appear in the GlobalAssemblyInfo.cs file. In our example here, this is what we end up with:

    using System.Reflection;
    using System.Runtime.CompilerServices;
    using System.Runtime.InteropServices;
    
    // General Information about an assembly is controlled through the following 
    // set of attributes. Change these attribute values to modify the information
    // associated with an assembly.
    [assembly: AssemblyDescription("")]  // This is not visible on the Details tab of the Explorer pane
    
    // Setting ComVisible to false makes the types in this assembly not visible 
    // to COM components.  If you need to access a type in this assembly from 
    // COM, set the ComVisible attribute to true on that type.
    [assembly: ComVisible(false)]
    
    // The following GUID is for the ID of the typelib if this project is exposed to COM
    [assembly: Guid("dad09178-814d-43f4-b76d-0fbe29a32544")]
    

    Other Posts in this Series

    1. Mapping Binaries in the Field to Source Code in the Repository
    2. Versioning a Native C/C++ Binary with Visual Studio
    3. Versioning a .NET Assembly with Visual Studio
    4. Integrating the Mercurial Revision into the Version Automatically with Native C/C++
    5. Integrating the Mercurial Revision into the Version Automatically with .NET
    6. Integrating the Subversion Revision into the Version Automatically with Native C/C++
    7. Integrating the Subversion Revision into the Version Automatically with .NET
  • Integrating the Subversion Revision into the Version Automatically with Native C/C++

    We’ve covered how to automatically include the mercurial revision into the version. Now how about doing this for Subversion?

    The basics of how to accomplish this are much the same as in the mercurial example. The major difference is that I don’t use WSH to generate the version file. Unlike TortoiseHg, which includes the CLI tools for Mercurial, TortoiseSVN does not. Therefore you have two choices:

    1. Download a CLI SVN implementation like SlikSVN and implement a script similar to the one that we did for Hg.
    2. Use the SubWCRev.exe utility that comes with TortoiseSVN to generate your version file from a template

    Since I already use TortoiseSVN and SubWCRev has already done the heavy-lifting for me, I’ve decided to go that route. As usual, I’ll be doing my example using Visual Studio 2010 Professional although these techniques should work on other versions of VS as well.

    The source code for this post is available here.

    Step 1: Setup Basic Versioning

    First we need to have the basic building blocks in place, as discussed in Versioning a Native C/C++ Binary with Visual Studio

    Step 2: Add an SVN Version Template

    Next we create a file named svn_version.h.tmpl in our project. I generally keep it under the Resources filter. This file serves as the basis of the SVN version header that we ultimately want to include in our project. The tokens (e.g. $WCREV$) will be automatically replaced by the SubWCRev utility later.

    #ifndef _SVN_VERSION_H_
    #define _SVN_VERSION_H_
    
    #define SVN_LOCAL_MODIFICATIONS $WCMODS?1:0$  // 1 if there are modifications to the local working copy, 0 otherwise
    #define SVN_REVISION            $WCREV$       // Highest committed revision number in the working copy
    #define SVN_TIME_NOW            $WCNOW$       // Current system date &amp; time
    
    #endif
    

    Step 3: Add the Pre-build Step

    Finally we need to add a pre-build step which will execute the SubWCRev tool, thus generating the svn_version.h file prior to the binary being built.

    1. Right-click on your project
    2. Select Properties
    3. Click Build Events
    4. Click Pre-Build Event
    5. In the Configuration drop-down, select All Configurations
    6. In the Command Line field, enter:
      SubWCRev.exe $(SolutionDir) $(ProjectDir)\svn_version.h.tmpl $(ProjectDir)\svn_version.h
    7. In the Description field, add a comment such as:
      Generate the svn_version.h file with the necessary repo identify info for versioning

    NOTE:If you have multiple projects in the same solution that all need to use the same information from Subversion you have a few choices. One is to put the template and pre-build event in one project which all the other projects depend on and add a link to the svn_version.h file that gets generated. Another option is to create a specific version project that all it does is generate the svn_version.h file and define common version information and then have every project in the solution depends on it so it’s executed first in the build order.

    Step 4: Update Version.h

    The version.h file we created in the basic versioning post needs to be updated to include the generated svn_version.h file and to make use of its defines.

    #include "svn_version.h"
    
    #define STRINGIZE2(s) #s
    #define STRINGIZE(s) STRINGIZE2(s)
    
    #define VERSION_MAJOR               1
    #define VERSION_MINOR               0
    #define VERSION_REVISION            0
    #define VERSION_BUILD               SVN_REVISION
    
    #if SVN_LOCAL_MODIFICATIONS
      #define VERSION_MODIFIER "M"
    #else
      #define VERSION_MODIFIER
    #endif
    
    #define VER_FILE_DESCRIPTION_STR    "Built " STRINGIZE(SVN_TIME_NOW) " from r" STRINGIZE(SVN_REVISION)
    #define VER_FILE_VERSION            VERSION_MAJOR, VERSION_MINOR, VERSION_REVISION, VERSION_BUILD
    #define VER_FILE_VERSION_STR        STRINGIZE(VERSION_MAJOR)        \
                                        "." STRINGIZE(VERSION_MINOR)    \
                                        "." STRINGIZE(VERSION_REVISION) \
                                        "." STRINGIZE(VERSION_BUILD)    \
                                        VERSION_MODIFIER
    
    #define VER_PRODUCTNAME_STR         "c_svn_autoversion"
    #define VER_PRODUCT_VERSION         VER_FILE_VERSION
    #define VER_PRODUCT_VERSION_STR     VER_FILE_VERSION_STR
    
    #if LIBRARY_EXPORTS
      #define VER_ORIGINAL_FILENAME_STR VER_PRODUCTNAME_STR ".dll"
    #else
      #define VER_ORIGINAL_FILENAME_STR VER_PRODUCTNAME_STR ".exe"
    #endif
    #define VER_INTERNAL_NAME_STR       VER_ORIGINAL_FILENAME_STR
    
    #define VER_COPYRIGHT_STR           "Copyright (C) 2011"
    
    #ifdef _DEBUG
      #define VER_VER_DEBUG             VS_FF_DEBUG
    #else
      #define VER_VER_DEBUG             0
    #endif
    
    #define VER_FILEOS                  VOS_NT_WINDOWS32
    #define VER_FILEFLAGS               VER_VER_DEBUG
    
    #if LIBRARY_EXPORTS
      #define VER_FILETYPE              VFT_DLL
    #else
      #define VER_FILETYPE              VFT_APP
    #endif
    

    Step 6: Add SVN Ignore on svn_version.h

    Finally, we need to go ahead and add an svn:ignore on svn_version.h because we don’t want its difference checking in every commit and we don’t want it constantly marking the working copy as modified if it’s tracked.

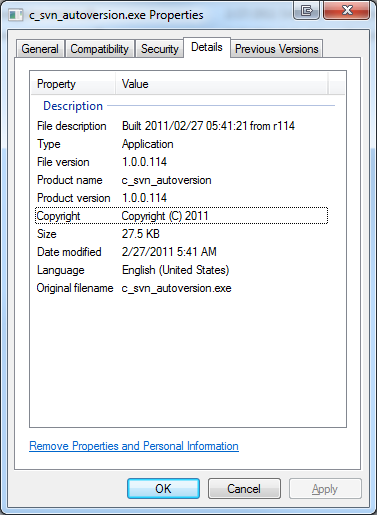
    Results

    Now when each time you build your projects, the latest Subversion information of the working copy is automatically included in the file version information.

    Version info with Subversion
    Version info with Subversion

    Final Thoughts

    So there you have it, you can now automatically include all the necessary information from your Subversion working copy in your build to map them one-to-one with the source code that was used.

    Other Posts in this Series

    1. Mapping Binaries in the Field to Source Code in the Repository
    2. Versioning a Native C/C++ Binary with Visual Studio
    3. Versioning a .NET Assembly with Visual Studio
    4. Integrating the Mercurial Revision into the Version Automatically with Native C/C++
    5. Integrating the Mercurial Revision into the Version Automatically with .NET
    6. Integrating the Subversion Revision into the Version Automatically with Native C/C++
    7. Integrating the Subversion Revision into the Version Automatically with .NET