Category: VMware

  • Resolving Event ID 1053 on Windows Server 2012 R2 with DHCP and Multiple NICs

    The Problem

    The DHCP server on my Windows Server 2012 R2 Essentials domain controller shutdown (Event ID 1054) when I added an additional NIC and plugged it in. The root cause as reported in the event log was an EventID 1053 stating: “The DHCP/BINL service has encountered another server on this network with IP Address, x.x.x.x, belonging to the domain: .”

    Background

    One of the built-in features to Window’s DHCP server is rogue DHCP server detection. If more than one server on a LAN segment is responding to DHCP requests then all hell breaks loose. By default, when the Windows DHCP server detects a rogue DHCP server, it shuts itself down reporting Event IDs 1053 and 1054.

    In my case, I do want the DC’s DHCP server to service requests on one of the LAN segments which is on one of the NICs. However, I have a second NIC that I’m passing through to virtual machines that I do not want the DC to even have an IP address, much less to service DHCP requests. There is a virtual machine running on that LAN segment which is servicing the DHCP requests. The Windows DHCP server however listens for DHCP servicing on all network interfaces. So although the DC’s DHCP has no responsibility to service that scope, for whatever reason, it is still insisting on shutting down in the presence of this other DHCP server. I tried authorizing the other DHCP server, I tried removing the binding to that network, I tried giving it a static IP address on that network and all sorts of other variations. I would expect that there is a proper way to fix this but I was completely unable to determine what that fix is. It may be that the authorization didn’t work because the other DHCP server isn’t a Windows machine or that the Essentials SKU doesn’t support multiple DHCP servers.

    Solution

    The only solution that I could find that worked was a registry modification to disable rogue DHCP server detection. This is sort of the nuclear option and I would have liked a more elegant solution, but this is what I’ve got.

    NOTE: Be sure that this is what you want to do! In most cases, you do not want to do this. You frequently want to adjust your scopes, adjust your bindings, or use DHCP relays/IP helpers and rarely do you ever want to resort to turning off rogue DHCP detection.

    1. Add a new registry value entry to HKEY_LOCAL_MACHINE\SYSTEM\CurrentControlSet\Services\DHCPServer\Parameters of type REG_DWORD named DisableRogueDetection with a value of 0x1
    2. Restart the Windows DHCP server which as been shutting down with EventIDs 1053,1054

    Reference

    DHCP network interface card bindings
    DHCP Binding only to one interface card
    Event ID 1053 — DHCP Authorization and Conflicts
    DHCP/BINL Service
  • BSOD When Installing Windows 7 Checked Build with VMWware Workstation 7

    The Blue Screen of Death

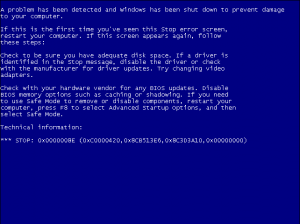
    I was creating a Windows 7 VM using the checked build and during the OS installation process I was treated to the following BSOD: STOP: 0x0000008E (0xC0000420,0x8CB513E6,0x8C3D3A10,0x0000000)

    Windows 7 x86 Checked Build VMWware BSOD

    The TLDR Fix

    Add the following to the virtual machine’s configuration file (.vmx):

    piix4pm.smooth_acpi_timer = "TRUE"

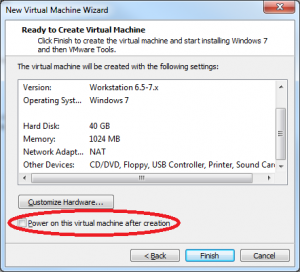
    Also, when creating the virtual machine using the “New Virtual Machine Wizard”, be sure to uncheck the box on the last step called “Power on this virtual machine after creation” so that you have the opportunity to edit the vmx file before installation begins.

    VMWare – New Vitual Machine Wizard

    Digging Deeper

    I tried rebooting a few times and each time resulted in BSOD with the same stop code and exception code. The stop code 0x0000008E corresponds to the Bug Check code 0x8E which is KERNEL_MODE_EXCEPTION_NOT_HANDLED. From the MSDN article we can see the 4 values after the stop code are:

    1. the exception code that was not handled
    2. the address where the exception occurred
    3. the trap frame
    4. and a reserved parameter

    Looking in the Ntstatus.h from the WDK we can see that exception code 0xC0000420 is STATUS_ASSERTION_FAILURE.

    So why is a checked build of Windows throwing an assertion when installed inside of VMWare Workstation? A quick google searched turned up this recommendation. I was a bit curious as to what the piix4pm.smooth_acpi_timer option was and why an ACPI timer would be causing kernel driver crashes on checked builds but not free builds of Windows. I found this VMWare Knowledge Base article on this issue for Windows Vista and Server 2008 which sheds some light on it. The PIIX4 acronym refers to the Intel PCI ISA IDE Xcelerator (which wikipedia calls the Intel IDE ISA Xcelerator for some reason). From page 2 of this this Intel datasheet:

    The 82371AB PCI ISA IDE Xcelerator (PIIX4) is a multi-function PCI device implementing a PCI-to-ISA bridge
    function, a PCI IDE function, a Universal Serial Bus host/hub function, and an Enhanced Power Management
    function.

    It goes on to say (emphasis mine):

    PIIX4 supports Enhanced Power Management, including full Clock Control, Device Management for up to
    14 devices, and Suspend and Resume logic with Power On Suspend, Suspend to RAM or Suspend to Disk. It
    fully supports Operating System Directed Power Management via the Advanced Configuration and Power
    Interface (ACPI)
    specification. PIIX4 integrates both a System Management Bus (SMBus) Host and Slave
    interface for serial communication with other devices.

    So it appears that the default behavior of the ACPI abstraction in VMWare workstation occasionally violates timer reads which doesn’t play nicely with the hal!HalpGenerateConsistentPmTimerRead assertion in checked builds of Windows. To understand why the guest OS relies on these timer reads and the challenges a virtual machine faces in providing them see “Timekeeping in VMWare Virtual Machines”. The fix is to turn on the smooth_acpi_timer option which I can’t seem to find anymore documentation on.

    For what it’s worth, I am running VMware Workstation 7.1.5 build-491717 and using the en_windows_7_debug_checked_build_dvd_x86_398742.iso from MSDN.

  • Ubuntu 11.04 Natty Narwhal Upgrade – Grub Prompt on First Reboot

    I just updated one of my VMs from Ubuntu 10.10 to 11.04 Natty Narwhal using the Update Manager. All seemed to go well during the upgrade process. When it rebooted for the first time however, I was left with a grub prompt rather than a booting system. Grrrrrr.

    NOTE: The following assumes the default disk layout. If you installed to a different disk or partition, you’ll have to adjust the steps below accordingly.

    The fix is to manually boot the system at the grub prompt by typing

    set root=(hd0,1)
    linux /boot/vmlinux-2.6.38-8-generic root=/dev/sda1 ro
    initrd /boot/initrd.img-2.6.38-8-generic
    boot

    Then once you are successfully booted, re-install grub like this:

    sudo grub-install /dev/sda
    sudo update-grub

    Thanks to Rob Convery for the tip!

  • HOWTO: VMWare Server on CentOS 5.4

    I have a habit of creating .notes files whenever I’m doing system admin type work. I’ve collected a number of these over the years and I refer back to them fairly regularly whether I’m doing something similar or just looking for a specific command. I’ll be placing a bunch of these up here for easier access for me as well as public consumption in case anyone else finds them useful. They will be posted pretty much unedited, so they won’t be in the same “format” as I’ve used in the past, but hopefully they are sufficiently legible :-).

    Installation and Configuration of VMWare Server 2.x on CentOS 5.4 and 5.5. These instructions should mostly work on 5.0-5.6, note however that the glibc workaround is only necessary on 5.4 and 5.5. VMWare Server is no longer supported by VMWare but I continue to use it until I can upgrade my hardware to be ESXi compatible.

    # File: HOWTO_VMwareServer_on_CentOS_5.4.notes
    # Auth: burly
    # Date: 02/28/2010
    # Refs: http://www.cyberciti.biz/tips/vmware-on-centos5-rhel5-64-bit-version.html
    #       http://sanbarrow.com/vmx/vmx-config-ini.html
    #       http://kb.vmware.com/selfservice/microsites/search.do?language=en_US&cmd=displayKC&externalId=844
    #       http://pubs.vmware.com/vi301/resmgmt/wwhelp/wwhimpl/common/html/wwhelp.htm?context=resmgmt&file=vc_advanced_mgmt.11.32.html
    # Desc: Installation of VMware Server 2.0.2 on CentOS 5.4 x86-64
    
    # Download VMware Server 2.x
    
    # Install dependencies
    yum install gcc gcc-c++ kernel-headers kernel-devel libXtst-devel libXrender-devel xinetd
    
    # Install VMware server
    rpm -ivh VMware-server-2.x.x-XXXXX.<arch>.rpm
    
    # Configure VMware server
    vmware-config.pl
    
    # Answer the series of questions. My answers are below:
    Networking: yes
    Network Type: Bridge
    Network Name: Bridged
    . vmnet0 is bridged to eth0
    NAT: no
    Host-only: no
    remote connectiosn port: 902
    http connections: 8222
    https connections: 8333
    Different Admin: yes
    Admin user: <my user account>
    VM File Location: /vwmare/vms
    VMware VIX API files: Default locations
    
    # ##########################################################
    # Deal with the hostd/glibc compatilibity issues of VMware 
    # Server 2.x w/ CentOS 5.4 - 5.5 (no issues with CentOS 5.3 
    # and earlier or CentOS 5.6. VMware Server had not addressed
    # this as of VMware Server 2.0.2-203138
    
    # Get the necessary glibc file from 5.3
    mkdir ~/vmwareglibc
    cd ~/vmwareglibc
    wget http://vault.centos.org/5.3/os/x86_64/CentOS/glibc-2.5-34.x86_64.rpm
    rpm2cpio glibc-2.5-34.x86_64.rpm | cpio -ivd
    
    # Stop the vmware service and kill any instances of hostd
    service vmware stop
    killall vmware-hostd
    
    # Move the libc file 
    mkdir /usr/lib/vmware/lib/libc.so.6
    mv lib64/libc-2.5.so /usr/lib/vmware/lib/libc.so.6/libc.so.6
    
    # Edit the VMware hostd process script
    vim /usr/sbin/vmware-hostd
    
    # At line 372, before the program is called, insert an
    # empty line and the following
    export LD_LIBRARY_PATH=/usr/lib/vmware/lib/libc.so.6:$LD_LIBRARY_PATH
    
    # Start the vmware service
    service vmware start
    
    # Set the service to run on startup
    chkconfig vmware on
    
    # -----------------------------------------------------------------------------
    #                           Optional Performance Tunings
    # -----------------------------------------------------------------------------
    
    # -------------------------------------
    #    Server-wide Host VMware Settings
    # -------------------------------------
    
    # The following changes are made in /etc/vmware/config
    
    # Fit memory into RAM whenever possible and don't ballon
    # and shrink memory as needed.
    prefvmx.useRecommendedLockedMemSize="TRUE"
    prefvmx.minVmMemPct = "100"
    
    # By default, VMware will back the guest's main memory with
    # a file the size of  the guest's nominal RAM in the working
    # directory (next to the vmdk). If we turn this off, then in
    # Linux the memory backed file will be created in the 
    # temporary directory while on Windows it will be back by the 
    # host's swap file. On Linux hosts, if we turn off named file
    # backing AND use a shared memory file system in RAM for the 
    # temporary directory, we will miss the disk completely
    # unless we are out of RAM on the host system.
    mainMem.useNamedFile = "FALSE"
    tmpDirectory = "/dev/shm"
    
    # The following changse are made in /etc/sysctl.conf
    # Disabling the kernel from over committing memory and only
    # using swap when physical memory has been exhausted helps
    # overall performance (vm.swapiness). The maximum user 
    # frequency covers how fast a virtual machine can set 
    # it's tick count to. The vm.dirty options tune how the
    # VM subsystem commits I/O operations to disk, you may 
    # not want to tune these values if you do not have a
    # stable power source.
    # http://peterkieser.com/technical/vmware-server-issues/
    vm.swappiness = 0
    vm.overcommit_memory = 1
    vm.dirty_background_ratio = 5
    vm.dirty_ratio = 10
    vm.dirty_expire_centisecs = 1000
    dev.rtc.max-user-freq = 1024
    
    
    # -------------------------------------
    #            Host OS Settings
    # -------------------------------------
    
    # In order for the VMWare configuration to work properly 
    # with shared memory, you'll need to increase the default
    # shared memory size for tmpfs to match the amount of
    # memory in your system. This can be done by
    # editing /etc/fstab
    tmpfs                   /dev/shm                tmpfs   size=8G                    0 0
    
    # In order for the tmpfs changes to take effect, 
    # remount the tmpfs
    mount -o remount /dev/shm
    
    # The following changes are made in /etc/rc.d/rc.local
    
    # Read ahead on the hard drive should be set to an
    # optimal value I have found an optimal value is
    # between 16384 and 32768.
    # http://peterkieser.com/technical/vmware-server-issues/
    blockdev --setra 32768 /dev/md1
    
    # The following items are added as boot-time options
    # to the kernel for the host. To enable these values,
    # add them to /boot/grub/menu.lst at the end of the
    # kernel line.
    
    # On the host operating system, consider using deadline 
    # I/O scheduler (enabled by adding elevator=deadline to
    # kernel boot parameters), and noop I/O scheduler in
    # the guest if it is running Linux 2.6; using the noop 
    # scheduler enables the host operating system to better 
    # optimize I/O resource usage between different virtual machines.
    # http://peterkieser.com/technical/vmware-server-issues/
    elevator=deadline
    
    # -------------------------------------
    #            Per VM Settings
    # -------------------------------------
    
    # The following changes are made to the guest's vmx file
    
    # If we have enough RAM for all the guests to have their
    # memory in physical RAM all the time, then we can avoid 
    # the ballooning (grow/shrinking) to save CPU cycles. 
    # Note this will force the VMware hypervisor to swap
    # rather than balloon if it's in need of memory. 
    # Swapping is less desirable than ballooning.
    sched.mem.maxmemctl = 0
    
    # Disable memory sharing for the VM. This prevents the
    # hypervisor from scanning the memory pages for places
    # to de-dup memory across VMs and save space. This scanning
    # doesn't come free however, and if we have enough physical
    # RAM to support all of our VMs, then we don't really need
    # the savings.
    sched.mem.pshare.enable = "FALSE"
    mem.ShareScanTotal = 0
    mem.ShareScanVM = 0
    mem.ShareScanThreshold = 4096
    
    
    # The VMware clock synchronization features are a bit
    # problematic. If the guest clock gets behind,then VMware
    # will catch it up by trying to issue all of the missed
    # ticks until it is caught up. However, if the guest gets
    # ahead, then the VMware clock will not bring it back. So,
    # I am going to use ntp on the guest machines. If you have
    # a large number of guests, it's best to setup a local ntpd
    # server to offload some of the traffic from the root pools.
    tools.syncTime = "FALSE"
    
    # When I reboot the host, I want to gracefully stop each
    # VM instead of just powering it off:
    autostop = "softpoweroff"
    
    # -------------------------------------
    #            Guest OS Settings
    # -------------------------------------
    
    # The following items are added as boot-time options to 
    # the kernel for the host. To enable these values, add
    # them to /boot/grub/menu.lst at the end of the kernel line.
    
    # On the host operating system, consider using deadline I/O
    # scheduler (enabled by adding elevator=deadline to kernel
    # boot parameters), and noop I/O scheduler in the guest if it 
    # is running Linux 2.6; using the noop scheduler enables the 
    # host operating system to better optimize I/O resource usage
    # between different virtual machines.
    # http://peterkieser.com/technical/vmware-server-issues/
    elevator=noop
    
    # The following kernel boot parameters will help performance 
    # and stability using Linux 2.6 as a guest. APCI/APIC support
    # must be enabled if you plan on using SMP virtualization in
    # the guest.Setting the clock to PIT has shown to have better
    # time keeping than other clock sources, your mileage may vary. 
    # Setting elevator to noop will enable the host operating 
    # system to better schedule I/O as it has an overview of the
    # whole system as opposed to just one virtual machine.
    # http://peterkieser.com/technical/vmware-server-issues/
    
    # The current (March 3, 2010) guidance from VMware is that 
    # clocksource is no longer required in CentOS 5.4 Use this 
    # guide to determine what time keeping settings you need
    # for your Guest OS
    # http://kb.vmware.com/selfservice/microsites/search.do?language=en_US&cmd=displayKC&externalId=1006427
    
    # CentOS 5.4 x86_64 Guest
    divider=10 elevator=noop