Versioning a .NET Assembly with Visual Studio

We’re already discussed the value of including version information in your binaries. Last post we talked about Versioning a Native C/C++ Binary with Visual Studio. This time we are going to talk about how to do this with a .NET assembly with Visual Studio. I’ll be using C# and Visual Studio 2010 but the principals work in VB .NET and other versions of Visual Studio as well.

First of all, credit where credit is due. Many of the details below are based on this stackoverflow question.

The source code for this post is available here.

Step 1: It’s Already Done!

Whenever you create a new .NET project in Visual Studio a file named AssemblyInfo.cs is created for you under the Properties folder. The annotations in the AssemblyInfo.cs file define the version characteristics include those found in the file properties. By default you’ll get a file like this which sets the copyright to Microsoft, the version to a fixed 1.0.0.0 (more on that in a moment) and a title that matches the project name.

using System.Reflection;
using System.Runtime.CompilerServices;
using System.Runtime.InteropServices;

// General Information about an assembly is controlled through the following
// set of attributes. Change these attribute values to modify the information
// associated with an assembly.
[assembly: AssemblyTitle("ClassLibrary1")]
[assembly: AssemblyDescription("")]
[assembly: AssemblyConfiguration("")]
[assembly: AssemblyCompany("Microsoft")]
[assembly: AssemblyProduct("ClassLibrary1")]
[assembly: AssemblyCopyright("Copyright © Microsoft 2011")]
[assembly: AssemblyTrademark("")]
[assembly: AssemblyCulture("")]

// Setting ComVisible to false makes the types in this assembly not visible
// to COM components.  If you need to access a type in this assembly from
// COM, set the ComVisible attribute to true on that type.
[assembly: ComVisible(false)]

// The following GUID is for the ID of the typelib if this project is exposed to COM
[assembly: Guid("6e0a5113-8d8a-4177-8de4-1c18b5b2c446")]

// Version information for an assembly consists of the following four values:
//
//      Major Version
//      Minor Version
//      Build Number
//      Revision
//
// You can specify all the values or you can default the Build and Revision Numbers
// by using the '*' as shown below:
// [assembly: AssemblyVersion("1.0.*")]
[assembly: AssemblyVersion("1.0.0.0")]
[assembly: AssemblyFileVersion("1.0.0.0")]

You can make changes directly to this file however after you have several projects in the same solution, it can get rather tedious to manually update this duplicative information across all your assemblies.

Step 2: Add a Solution-wide GlobalAssemblyInfo File for Common Info

To make life a little simpler moving forward and in keeping with that whole DRY thing you can use a single file to hold all the assembly information that is common across multiple projects. I generally organize my source tree such that there is a top-level Code directory, with separate sub-directories for each project. Therefore I find it most convenient to place a file named GlobalAssemblyInfo.cs in the Code directory, peer to all my project directories. You can place the file wherever you want, however.

Place common version info inside such as:


// This file contains common AssemblyVersion data to be shared across all projects in this solution.
using System.Reflection;

[assembly: AssemblyCompany("Zach Burlingame")]
[assembly: AssemblyProduct("DotNetVersionAssembly")]
[assembly: AssemblyCopyright("Copyright © Zach Burlingame 2011")]
[assembly: AssemblyTrademark("")]
[assembly: AssemblyCulture("")]

#if DEBUG
[assembly: AssemblyConfiguration("Debug")]
#else
[assembly: AssemblyConfiguration("Release")]
#endif

// Version information for an assembly consists of the following four values:
//
//      Major Version
//      Minor Version
//      Revision
//      Build
//
// You can specify all the values or you can default the Revision and Build Numbers by using the '*' as shown below:
// [assembly: AssemblyVersion("1.0.*")]
[assembly: AssemblyVersion("1.0.0.*")]
//[assembly: AssemblyFileVersion("1.0.0.*")]

Step 3: Add a link to the GlobalAssemblyInfo.cs file in each project

  1. In Visual Studio, right-click on a project
  2. Select Add->Existing Item
  3. Browse to GlobalAssemblyInfo.cs
  4. Select the file
  5. Click the drop-down arrow next to Add and select Add As Link
  6. Move the link to your Properties folder (optional, but keeps things neat)

Step 4: Update the AssemblyInfo.cs for each project

In order to avoid duplicate annotations for assembly information, you must remove entries from the AssemblyInfo.cs file that appear in the GlobalAssemblyInfo.cs file. In our example here, this is what we end up with:


using System.Reflection;
using System.Runtime.CompilerServices;
using System.Runtime.InteropServices;

// General Information about an assembly is controlled through the following
// set of attributes. Change these attribute values to modify the information
// associated with an assembly.
[assembly: AssemblyTitle("DotNetVersionAssembly")]
[assembly: AssemblyDescription("")]

// Setting ComVisible to false makes the types in this assembly not visible
// to COM components.  If you need to access a type in this assembly from
// COM, set the ComVisible attribute to true on that type.
[assembly: ComVisible(false)]

// The following GUID is for the ID of the typelib if this project is exposed to COM
[assembly: Guid("dad09178-814d-43f4-b76d-0fbe29a32544")]

Step 5: Auto-incrementing the build number

You might of noticed a couple of other changes I made in Step 3:

// Version information for an assembly consists of the following four values:
//
//      Major Version
//      Minor Version
//      Revision
//      Build
//
// You can specify all the values or you can default the Revision and Build Numbers by using the '*' as shown below:
// [assembly: AssemblyVersion("1.0.*")]
[assembly: AssemblyVersion("1.0.0.*")]
//[assembly: AssemblyFileVersion("1.0.0.*")]

By replacing build value with an asterisk, Visual Studio (and more specifically, MSBuild) will auto-increment that number every time you build. If you replace both the revision and the build value with a single asterisk it will cause both the revision and build number to auto-increment. This is helpful since the maximum value of any single field is 65535. By auto-incrementing both fields, the revision field is only incremented when the build value overflows, giving you in effect 4 billion unique version numbers for a given Major.Minor combination. If you overflow that, then for the love of pete increment your Major version already!

Also notice that I commented out the AssemblyFileVersion. The differences between the AssemblyVersion and AssemblyFileVersion are discussed here. The key in our example is that you can’t use asterisks to auto-increment the AssemblyFileVersion like you can the AssemblyVersion and you probably don’t want the two getting out-of-sync (at least in this versioning scheme). By not providing an AssemblyFileVersion, MSBuild will default to using the value from the AssemblyVersion.

Results

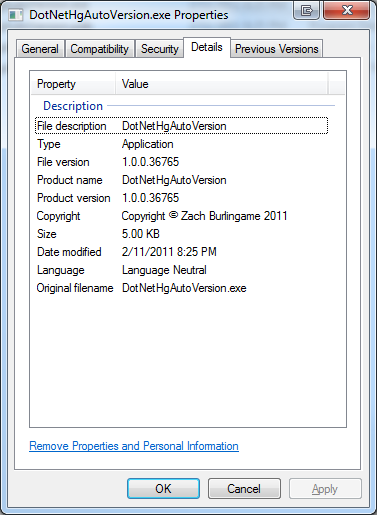
Now when you build your application, all the version info above will be defined in the assembly itself. Much of this information is available directly from the Details pane of the Properties window in Explorer.
Version Info

Version Info

Final Thoughts

Note that while it is possible to auto-increment the build and revision number of the assemblies, those numbers don’t correspond to anything in source control. I’ll be discussing how to make the BUILD number automatically correspond to the revision info from the working copy of the source code using Mercurial or Subversion in an upcoming post.

Other Posts in this Series

  1. Mapping Binaries in the Field to Source Code in the Repository
  2. Versioning a Native C/C++ Binary with Visual Studio
  3. Versioning a .NET Assembly with Visual Studio
  4. Integrating the Mercurial Revision into the Version Automatically with Native C/C++
  5. Integrating the Mercurial Revision into the Version Automatically with .NET
  6. Integrating the Subversion Revision into the Version Automatically with Native C/C++
  7. Integrating the Subversion Revision into the Version Automatically with .NET
<span class="entry-utility-prep entry-utility-prep-cat-links">Posted in</span> .NET, Visual Studio, Windows | <span class="entry-utility-prep entry-utility-prep-tag-links">Tagged</span> | 7 Comments

Versioning a Native C/C++ Binary with Visual Studio

Last time in  Mapping Binaries in the Field to Source Code in the Repository we talked about the value of including version information in your binaries. Today I’m going to explain how to accomplish this in Visual Studio for a native C/C++ binary. I’m using 2010 Professional, but it should work on other versions as well.

The source code is available here.

Step 1: Add a Version Resource

  1. Right-click on your project
  2. Select Add->Resource
  3. Select Version
  4. Click New

This will give you two files: resource.h and <project_name>.rc. I generally rename the .rc file to be version.rc

Step 2: Updating Version.rc

Out of the box the version.rc file will have you define the values right there. I recommend that you instead define the values in a version.h file and use those defines in the version.rc file.

Edit the resource file in a text editor:

  1. In the Solution Explorer, Right-click on version.rc
  2. Select Open With
  3. Select C++ Source Code Editor
  4. Scroll down to the Version section

Here is a template Version section that I frequently use (and will build on below):

/////////////////////////////////////////////////////////////////////////////
//
// Version
//
VS_VERSION_INFO VERSIONINFO
 FILEVERSION        VER_FILE_VERSION
 PRODUCTVERSION     VER_PRODUCT_VERSION
 FILEFLAGSMASK      0x3fL
 FILEFLAGS          VER_FILEFLAGS
 FILEOS             VER_FILEOS
 FILETYPE           VER_FILETYPE
 FILESUBTYPE        0x0L
BEGIN
    BLOCK "StringFileInfo"
    BEGIN
        BLOCK "040904b0"
        BEGIN
            VALUE "FileDescription",  VER_FILE_DESCRIPTION_STR "\0"
            VALUE "FileVersion",      VER_FILE_VERSION_STR "\0"
            VALUE "InternalName",     VER_INTERNAL_NAME_STR "\0"
            VALUE "LegalCopyright",   VER_COPYRIGHT_STR "\0"
            VALUE "OriginalFilename", VER_ORIGINAL_FILENAME_STR "\0"
            VALUE "ProductName",      VER_PRODUCTNAME_STR
            VALUE "ProductVersion",   VER_PRODUCT_VERSION_STR "\0"
        END
    END
    BLOCK "VarFileInfo"
    BEGIN
        VALUE "Translation", 0x409, 1200
    END
END

Step 3: Adding a Version Header

Next we create a file named version.h to provide a more convenient location to set the various version information. This is especially useful if you are sharing version information across multiple projects in a single solution. Here’s the information I generally start with mine:


#define STRINGIZE2(s) #s
#define STRINGIZE(s) STRINGIZE2(s)

#define VERSION_MAJOR               1
#define VERSION_MINOR               0
#define VERSION_REVISION            0
#define VERSION_BUILD               0

#define VER_FILE_DESCRIPTION_STR    "Description"
#define VER_FILE_VERSION            VERSION_MAJOR, VERSION_MINOR, VERSION_REVISION, VERSION_BUILD
#define VER_FILE_VERSION_STR        STRINGIZE(VERSION_MAJOR)        \
                                    "." STRINGIZE(VERSION_MINOR)    \
                                    "." STRINGIZE(VERSION_REVISION) \
                                    "." STRINGIZE(VERSION_BUILD)    \

#define VER_PRODUCTNAME_STR         "c_version_binary"
#define VER_PRODUCT_VERSION         VER_FILE_VERSION
#define VER_PRODUCT_VERSION_STR     VER_FILE_VERSION_STR
#define VER_ORIGINAL_FILENAME_STR   VER_PRODUCTNAME_STR ".exe"
#define VER_INTERNAL_NAME_STR       VER_ORIGINAL_FILENAME_STR
#define VER_COPYRIGHT_STR           "Copyright (C) 2011"

#ifdef _DEBUG
  #define VER_VER_DEBUG             VS_FF_DEBUG
#else
  #define VER_VER_DEBUG             0
#endif

#define VER_FILEOS                  VOS_NT_WINDOWS32
#define VER_FILEFLAGS               VER_VER_DEBUG
#define VER_FILETYPE                VFT_APP

Step 4: Add the Necessary Include

The final step is to add the necessary include line to the version.rc file for the version.h file:

// Microsoft Visual C++ generated resource script.
//
#include "resource.h"
#include "version.h"

#define APSTUDIO_READONLY_SYMBOLS

Results

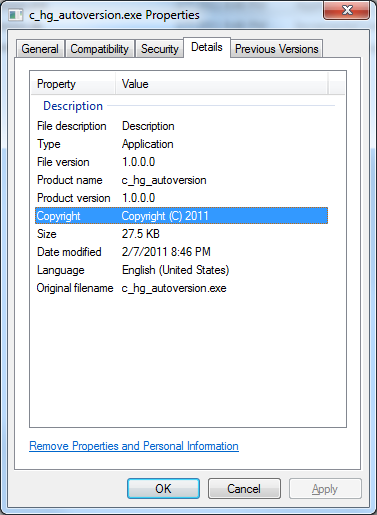
Now when you build your application, all the version info above will be defined in the binary itself. Much of this information is available directly from the Details pane of the Properties window in Explorer.

Version Info

Version Info

Final Thoughts

Note that this information is static from build to build. You must change the version numbering yourself or use a script to auto-increment values. I’ll be discussing how to make the BUILD number automatically correspond to the revision info from the working copy of the source code using Mercurial or Subversion in an upcoming post.

Other Posts in this Series

  1. Mapping Binaries in the Field to Source Code in the Repository
  2. Versioning a Native C/C++ Binary with Visual Studio
  3. Versioning a .NET Assembly with Visual Studio
  4. Integrating the Mercurial Revision into the Version Automatically with Native C/C++
  5. Integrating the Mercurial Revision into the Version Automatically with .NET
  6. Integrating the Subversion Revision into the Version Automatically with Native C/C++
  7. Integrating the Subversion Revision into the Version Automatically with .NET
<span class="entry-utility-prep entry-utility-prep-cat-links">Posted in</span> Native, Visual Studio, Windows | <span class="entry-utility-prep entry-utility-prep-tag-links">Tagged</span> , | 26 Comments

Mapping Binaries in the Field to Source Code in the Repository

The Scenario

Andrew from customer support walks down to your cubicle (wait, you have an office?! jealous.) and tells you that he has Joanne on the line from Widgets and Wrenches Unlimited. She says that your remote login software is crashing and they can’t access the server that controls the CNC machine which means they can’t make tools. One of the first things you are going to want to know, is “What version of the app are you running?”

Usually if it’s a product or mature application, there will be a straightforward way to get this information – an About page or the version name right in the application shortcut for instance. When it’s a smaller app or library, or when you need more specific information than “v1.2”  though, you might be up a creek. Numerous times I’ve run into this problem on an internal application where there is no installer, about page, or any other information on the version of the binary I’m looking at and what it’s origins might be.  Sometimes it’s as simple as “let’s just grab the latest version and try that”, but other times that’s not an option. My solution to this problem on many projects has been to include the version information in the binary or assembly itself. At the very least someone can view the Details tab on the Properties window in Explorer and get the info directly.  Best of all it works on all versions of Windows, even if the application won’t run.

A Solution

There are tons of different versioning schemes out there, but I tend to favor:

MAJOR.MINOR.REVISION.BUILD

Three things have been key for making this work for me:

  1. Make the least significant number (BUILD in my example above) correspond to the revision number from the source control repository.
  2. Note if the binary was built from a working copy with local modifications
  3. Make it happen automatically.

With these three things, we can take a binary and know exactly what revision we need to grab from source control to reproduce the problem. Before we release a binary to anyone, we can make sure it wasn’t built with local modifications (and thus potentially seriously complicating reproducing the problem). And since it all happens automatically, we don’t have to remember jump through any hoops. Yay!

How-To

The basic concept is that a pre-build step runs which grabs the version information from the source control tool for the working copy and generates an file which is included in our project. From there we include the information into our version scheme and then it’s just applied to a normal resource version file or AssemblyInfo.cs.

Another policy I try follow on my projects is having everything build on checkout with as minimal a development environment as possible (usually just Visual Studio and the source control tools). To that end, I try to avoid bringing a scripting engine like Python into the development environment just to allow a simple build script. So to accomplish that pre-build step, I use the Javascript engine for the Windows Script Host (WSH) which is built-in since Windows 98.

Over the next several posts, I’m going to explain how to accomplish this in Visual Studio. I’ll explain how to do it for a native C/C++ binary and a C# assembly as well as automating the BUILD number from Subversion and Mercurial.

Other Posts in this Series

  1. Mapping Binaries in the Field to Source Code in the Repository
  2. Versioning a Native C/C++ Binary with Visual Studio
  3. Versioning a .NET Assembly with Visual Studio
  4. Integrating the Mercurial Revision into the Version Automatically with Native C/C++
  5. Integrating the Mercurial Revision into the Version Automatically with .NET
  6. Integrating the Subversion Revision into the Version Automatically with Native C/C++
  7. Integrating the Subversion Revision into the Version Automatically with .NET
<span class="entry-utility-prep entry-utility-prep-cat-links">Posted in</span> Version Control, Visual Studio, Windows | <span class="entry-utility-prep entry-utility-prep-tag-links">Tagged</span> , , | 2 Comments